Hands On Auto Scaling FastAPI with Kubernetes
Hi! Today we will learn how to do auto-scaling with Kubernetes. We will use a FastAPI application as an example.
Overview
Overview Architecture
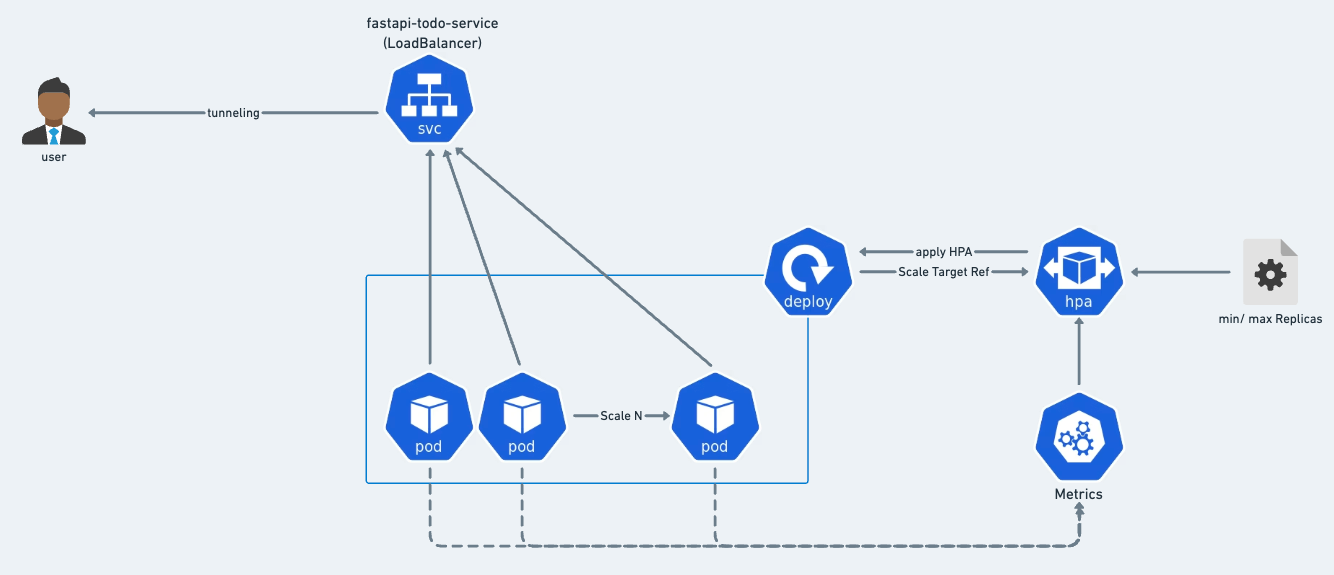
In this project, we have 1 fastapi application and we will deploy it to Kubernetes with deployment object. Then, we create loadbalancer service to expose the application. to access that in local we need to tunnel the service using minikube tunnel. After we deploy the application, we will create a Horizontal Pod Autoscaler (HPA) to scale the application based on CPU usage. We will use locust to generate load to the application and see how the HPA works.
Overview FastAPI Application
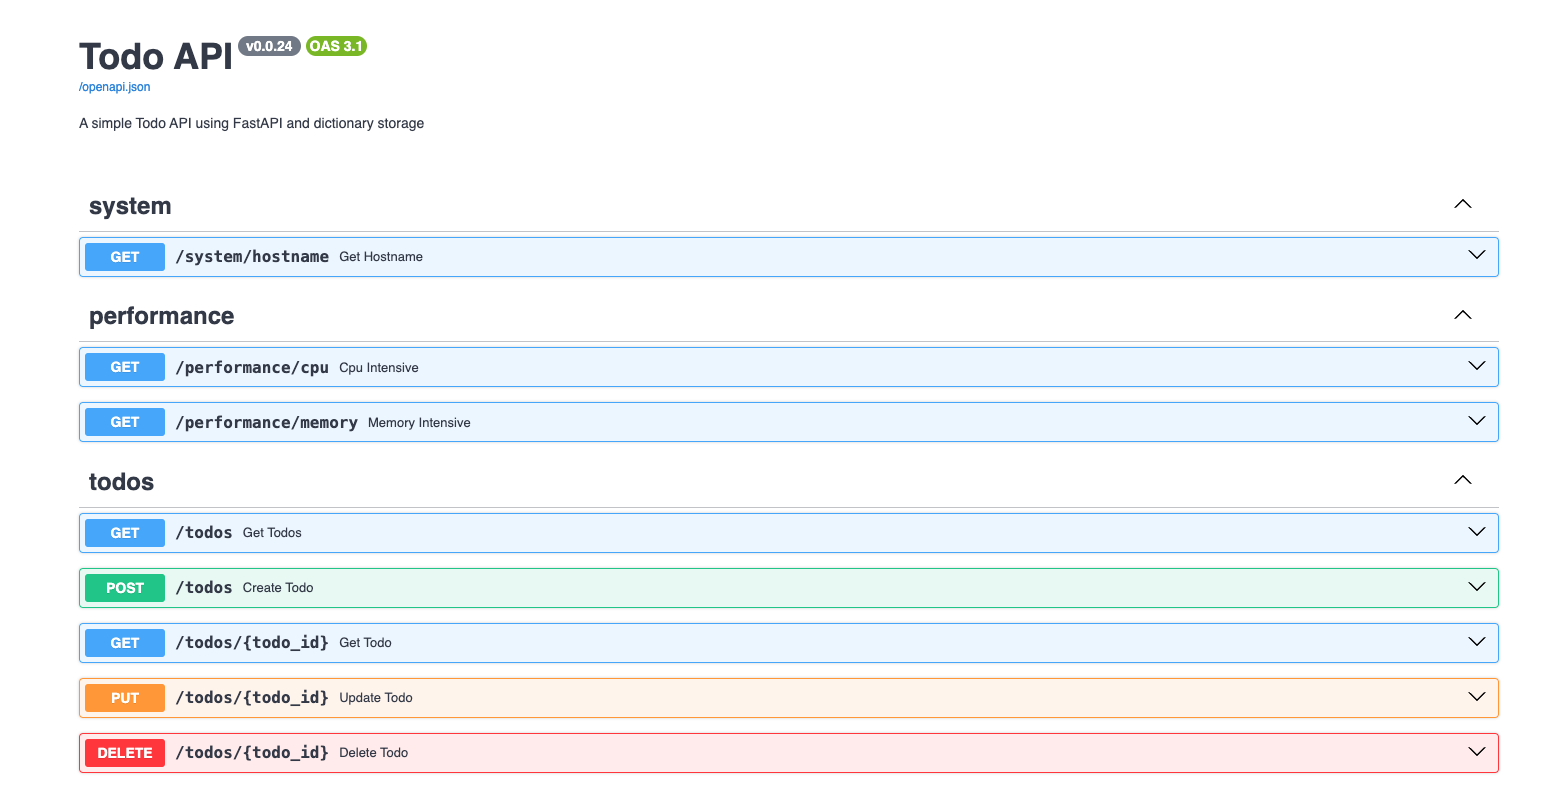
| FastAPI one of Endpoint | |
|---|---|
This endpoint will use to test the CPU usage. This code will generate random number 1 million times. This code will be used to test the CPU usage.
Resources
-
fastapi-todo-demo | syinx/fastapi-todo-demo
this repo contains the FastAPI application that we will use in this project. We shiped the image to Docker Hub with the name
syinx/fastapi-todo-demo:v0.0.24. You can pull the image from Docker Hub and run it locally. -
fastapi-kubernetes/003-hpa-deployment
this repo contains the
deployment.yamlandhpa.yamlfiles for this project.
Setup Kubernetes on Local Machine
Active Minikube
First, we need to start minikube and choose our profile and namespace. This is the command to start i use for this section:
This is following screenshot result of the commands above:

we can see we set the profile to demo-cluster and set the namespace to demo. We see profile list there are 3 profiles: (demo-cluster, ha-cluster, minikube). Then Active Profile is sign with * and Active Kubecontext with *.
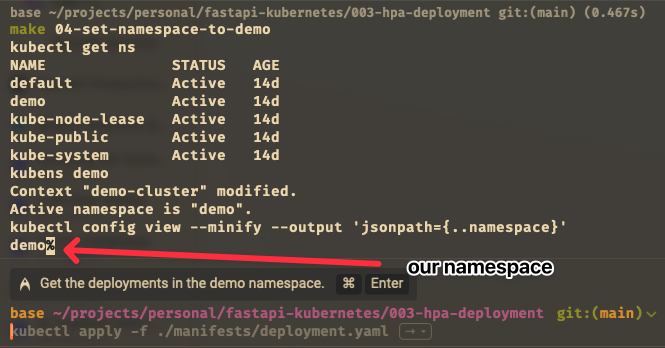
namespace use is demo
What is Active Profile and Active Kubecontext?
- Active Profile: is the profile that is currently active in minikube. This profile will be used to run the minikube cluster.
- Active Kubecontext: is the context that is currently active in kubectl. This context will be used to run the kubectl commands.
Install Metrics Server for HPA
Before we can use HPA, we need to install metrics server. This is needed to gather and provide resource usage metrics like CPU and Memory Utilization. HPA will use this metrics to scale the application. This is the command to install metrics server:
Warning
Make sure your profile is active in demo-cluster and namespace is demo
| install-metrics-server | |
|---|---|
Verify by running this command:
You will see the output like this:
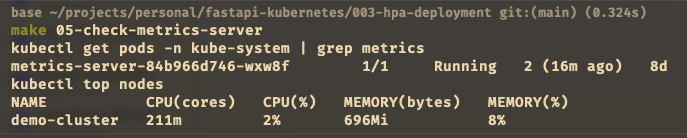
The picture show that metrics-server is running and we can see the nodes of the cluser usage for CPU (cores): 211m (2% utilization) and Memory (bytes): 696Mi (8% utilization).
If that solution not work, try this
| install-metrics-server | |
|---|---|
--kubelet-insecure-tls to the container args:
# spec > template > spec > containers > args. Add:
# - --kubelet-insecure-tls
# wait 10-20 seconds and check the metrics server
# 06.2-edit-container-metrics:
kubectl -n kube-system edit deployment metrics-server
...
      labels:
    k8s-app: metrics-server
spec:
  containers:
  - args:
    - --cert-dir=/tmp
    - --secure-port=10250
    - --kubelet-preferred-address-types=InternalIP,ExternalIP,Hostname
    - --kubelet-use-node-status-port
    - --kubelet-insecure-tls # <-- add this line
    - --metric-resolution=15s
...
Wait 10-20 seconds, then check metrics again and verify by running this command:
Deploy FastAPI Application
Now, we already set metrics server and we can deploy the FastAPI application. We will use kubectl apply to deploy the application via declarative way. We will use deployment.yaml and hpa.yaml files to deploy the application.
deployment.yaml
limitsis the maximum resources that the container can use. If the container exceeds this limit, it will be terminated and restarted. Here we set the limit to256Mifor memory and500mfor CPU. This should be more thanrequestsvalue.requestsis the minimum resources that the container needs to run. If the container does not have this resources, it will not be scheduled. Here we set the request to128Mifor memory and250mfor CPU. This should be less thanlimitsvalue.containerPortis the port that the container will listen on. Here we set the port to8000because FastAPI will run on this port.portis the port that the service will listen on. Here we set the port to8123because we want to access the application on this port.type: LoadBalanceris the type of service that we want to create. Here we set the type toLoadBalancerbecause we want to expose the application to the internet. This will create a load balancer in the cloud provider and assign a public IP address to it.
Notes:
limitsis the maximum resources that the container can use. If the container exceeds this limit, it will be terminated and restarted. Here we set the limit to256Mifor memory and500mfor CPU. This should be more thanrequestsvalue.requestsis the minimum resources that the container needs to run. If the container does not have this resources, it will not be scheduled. Here we set the request to128Mifor memory and250mfor CPU. This should be less thanlimitsvalue.containerPortis the port that the container will listen on. Here we set the port to8000because FastAPI will run on this port.portis the port that the service will listen on. Here we set the port to8123because we want to access the application on this port.type: LoadBalanceris the type of service that we want to create. Here we set the type toLoadBalancerbecause we want to expose the application to the internet. This will create a load balancer in the cloud provider and assign a public IP address to it.
hpa.yaml
scaleTargetRefis the target that we want to scale. Here we set the target tofastapi-todo-demo-appdeployment.minReplicasis the minimum number of replicas that we want to run. Here we set the minimum replicas to2.maxReplicasis the maximum number of replicas that we want to run. Here we set the maximum replicas to10.metricsis the metrics that we want to use to scale the application. Here we set the metrics tocpuutilization. We can also usememoryutilization by uncommenting the code and if we do that, the HPA will scale the application based on memory usage and CPU usage.behavioris the behavior of the HPA when scaling down. Here we set the stabilization window to10seconds and the policy to100%of the replicas. This means that if the HPA wants to scale down, it will wait for10seconds before scaling down and it will scale down100%of the replicas.
Notes
scaleTargetRefis the target that we want to scale. Here we set the target tofastapi-todo-demo-appdeployment.minReplicasis the minimum number of replicas that we want to run. Here we set the minimum replicas to2.maxReplicasis the maximum number of replicas that we want to run. Here we set the maximum replicas to10.metricsis the metrics that we want to use to scale the application. Here we set the metrics tocpuutilization. We can also usememoryutilization by uncommenting the code and if we do that, the HPA will scale the application based on memory usage and CPU usage.behavioris the behavior of the HPA when scaling down. Here we set the stabilization window to10seconds and the policy to100%of the replicas. This means that if the HPA wants to scale down, it will wait for10seconds before scaling down and it will scale down100%of the replicas.
For running that, we need to run this command:
| deploy-fastapi-app | |
|---|---|
Check Running the Application
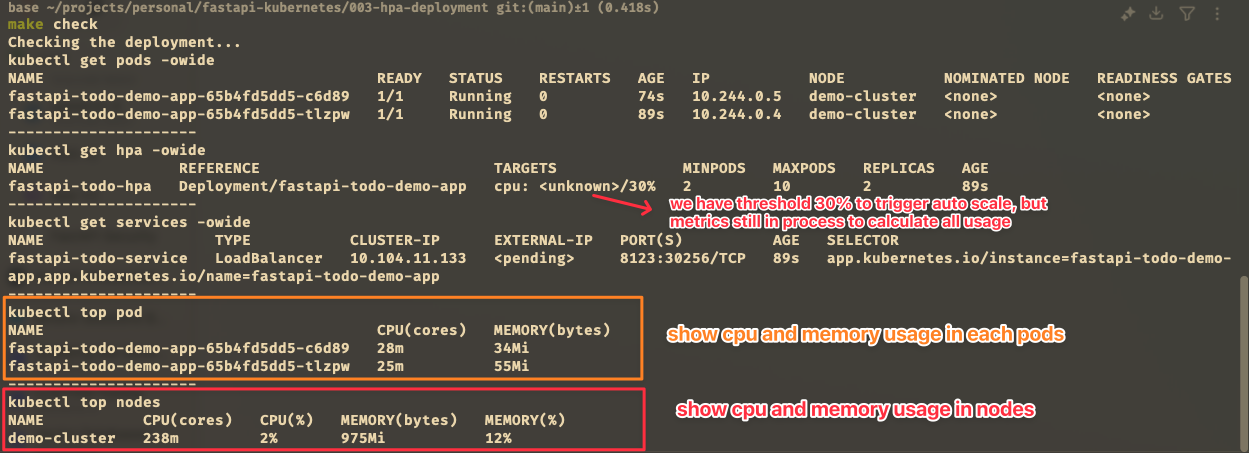
This section only check the application is running and the service is created. We can check the deployment and service by running this command:
| check-deployment | |
|---|---|
The output will look like this:

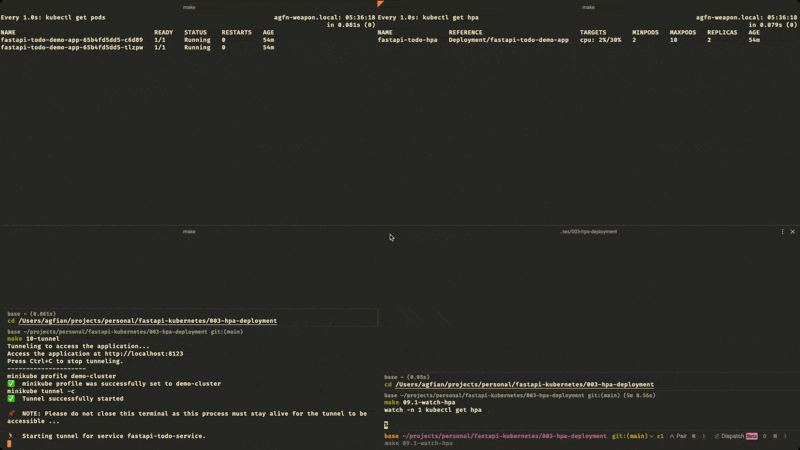
Tunneling the Service
To access the service, we need to tunnel the service using minikube tunnel. This will create a load balancer in the cloud provider and assign a public IP address to it. The command and result can see below (in screenshot):
- Tunnelling the service
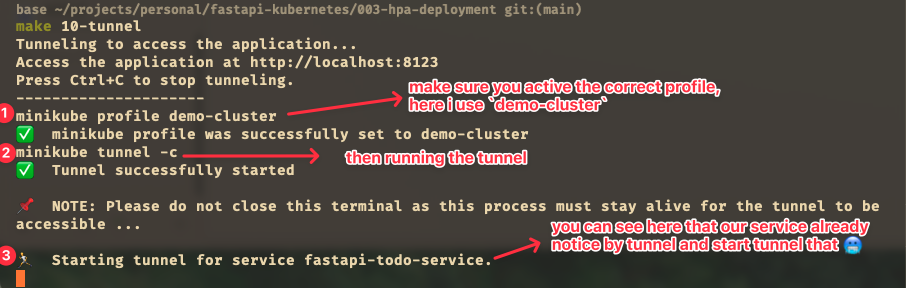
- curl the service via localhost:
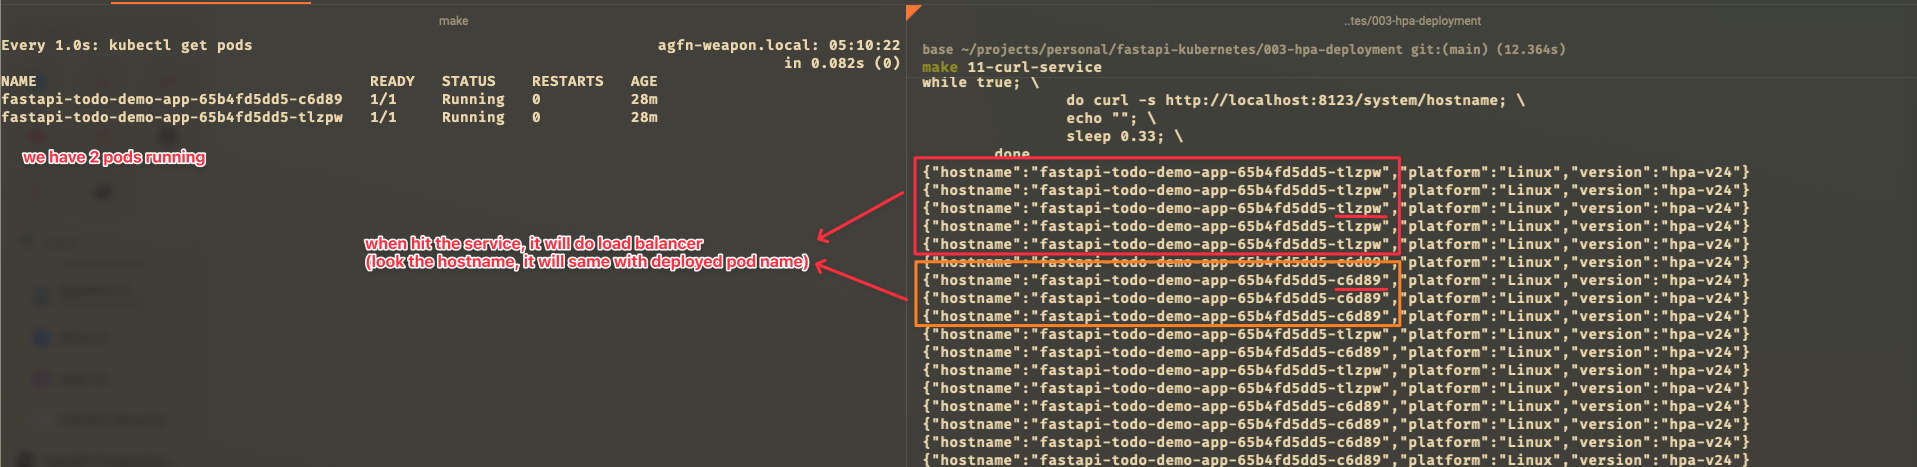
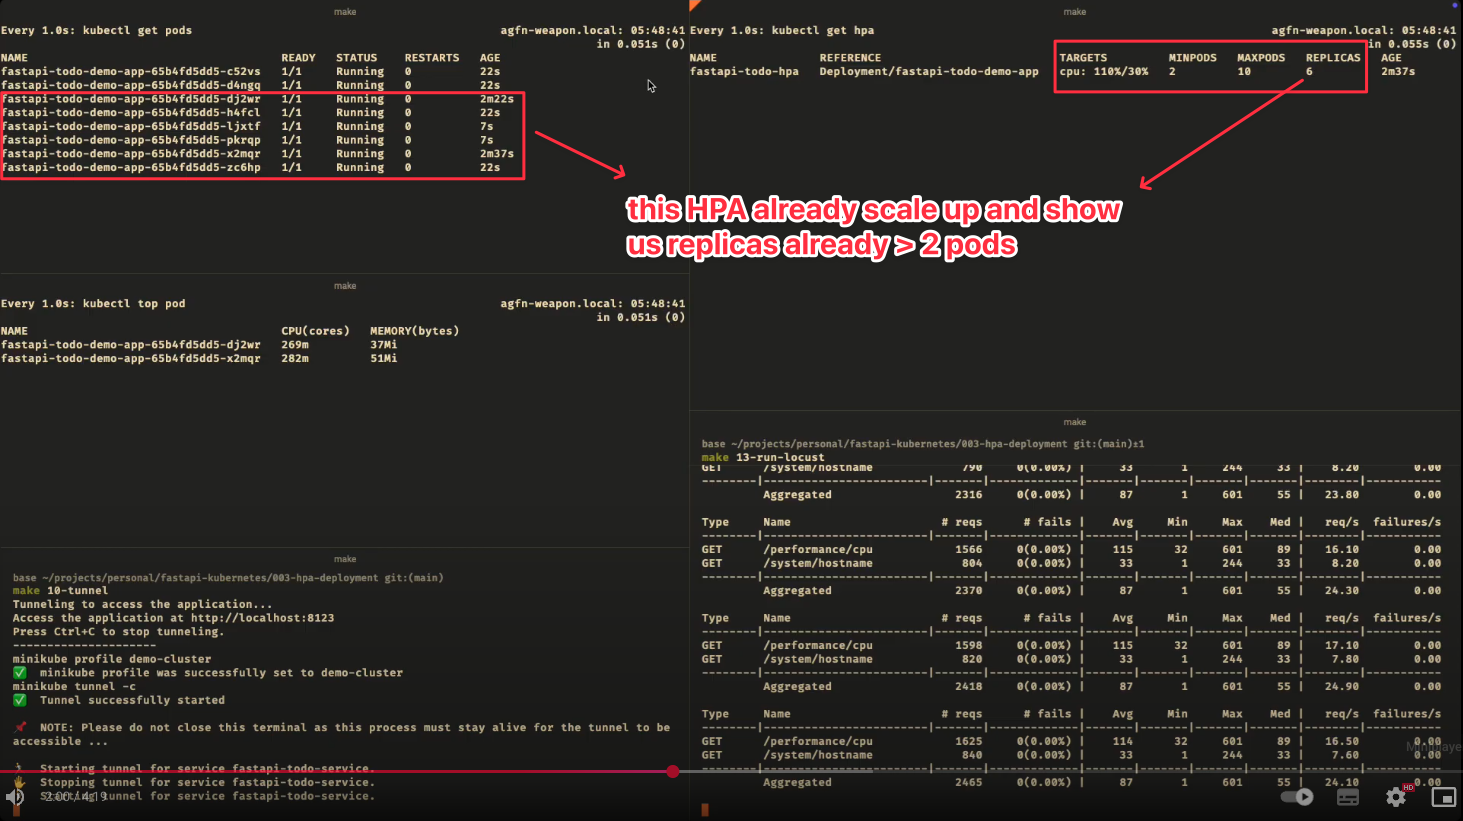
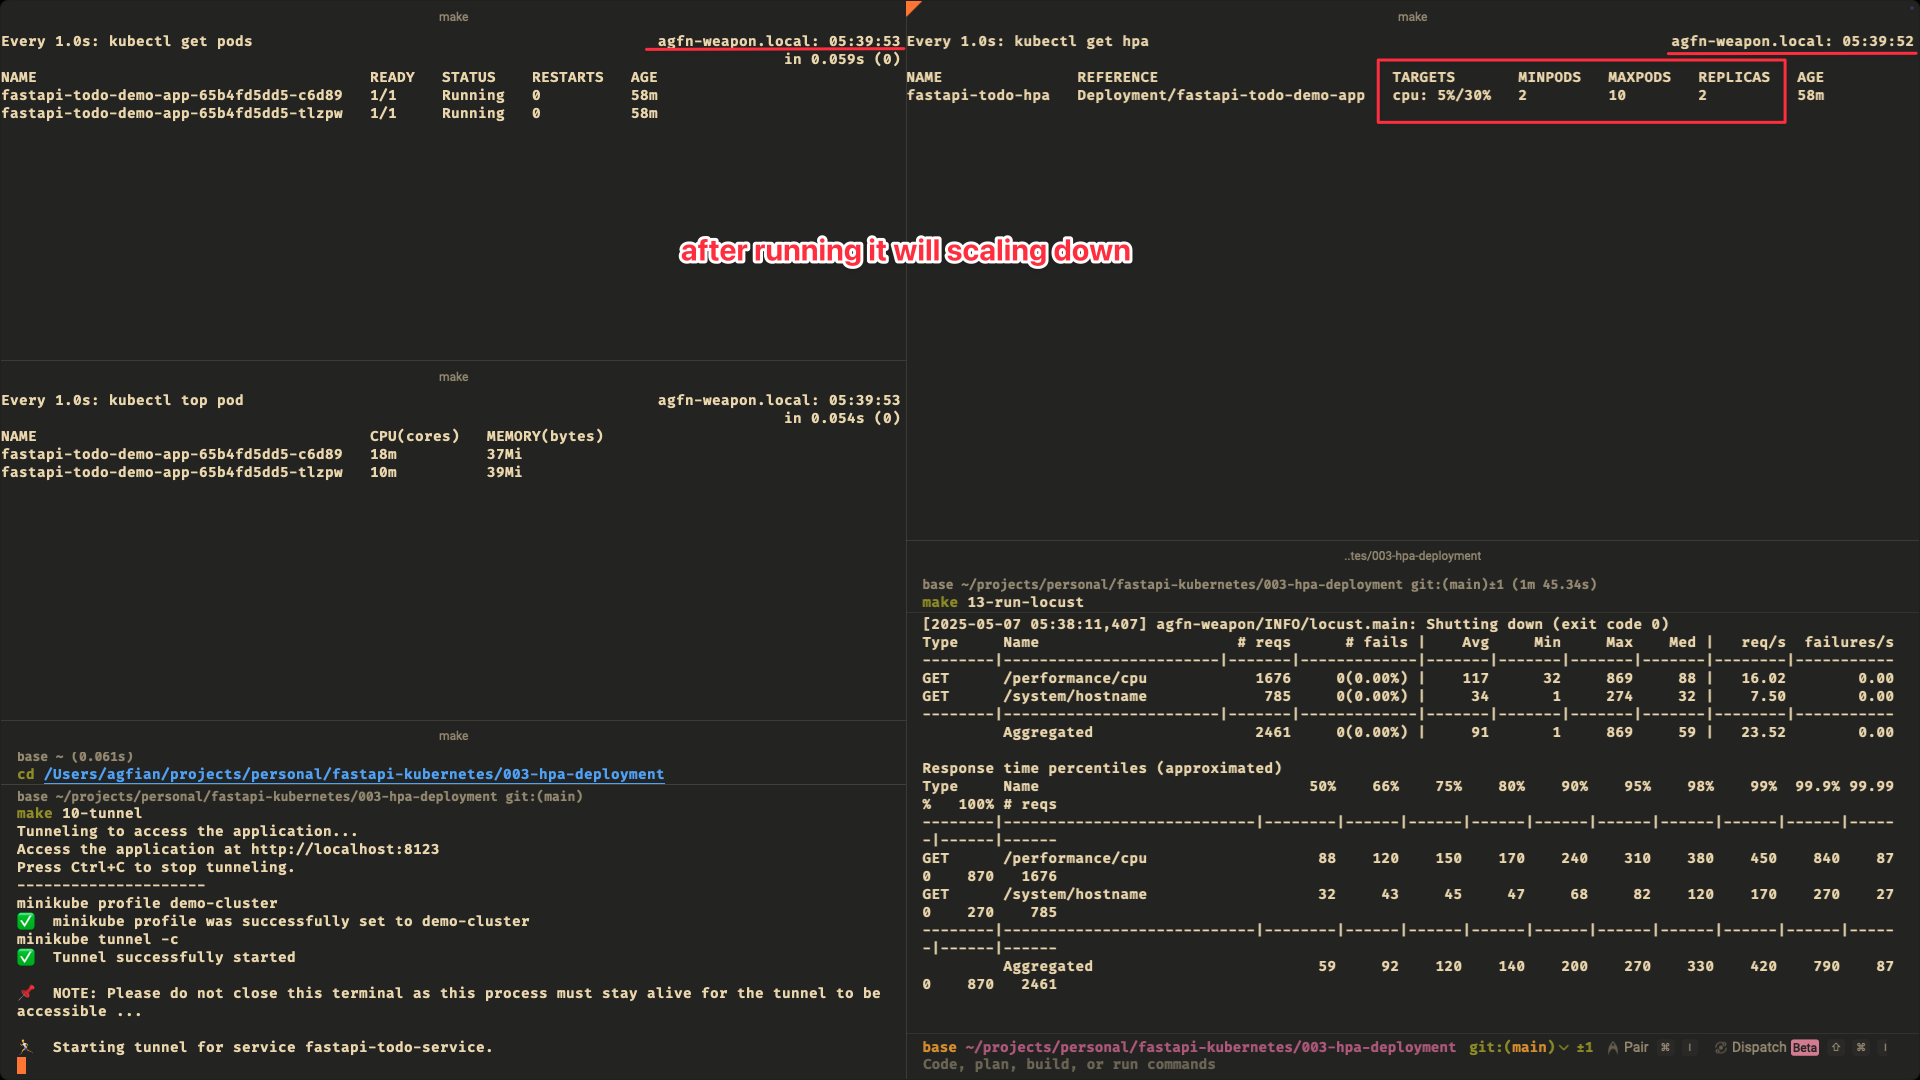
Test Auto Scaling
The service already running and we can access the service via localhost:8123. Now we can test the auto scaling using locust. We will use locust to generate load to the application and see how the HPA works. We will use locust to generate load to the application and see how the HPA works. We will use locust to generate load to the application and see how the HPA works.
locustfile.py
to run the locust, we need to run this command:
Here my setup for watching the HPA. I have 4-5 terminal windows:
Terminal 1: watching the pods and update every 1 secondTerminal 2: watching the hpa and update every 1 secondTerminal 3: tunneling the serviceTerminal 4: running locustTerminal 5: watching kubctl top pods and update every 1 second
Here the screenshot of the setup:
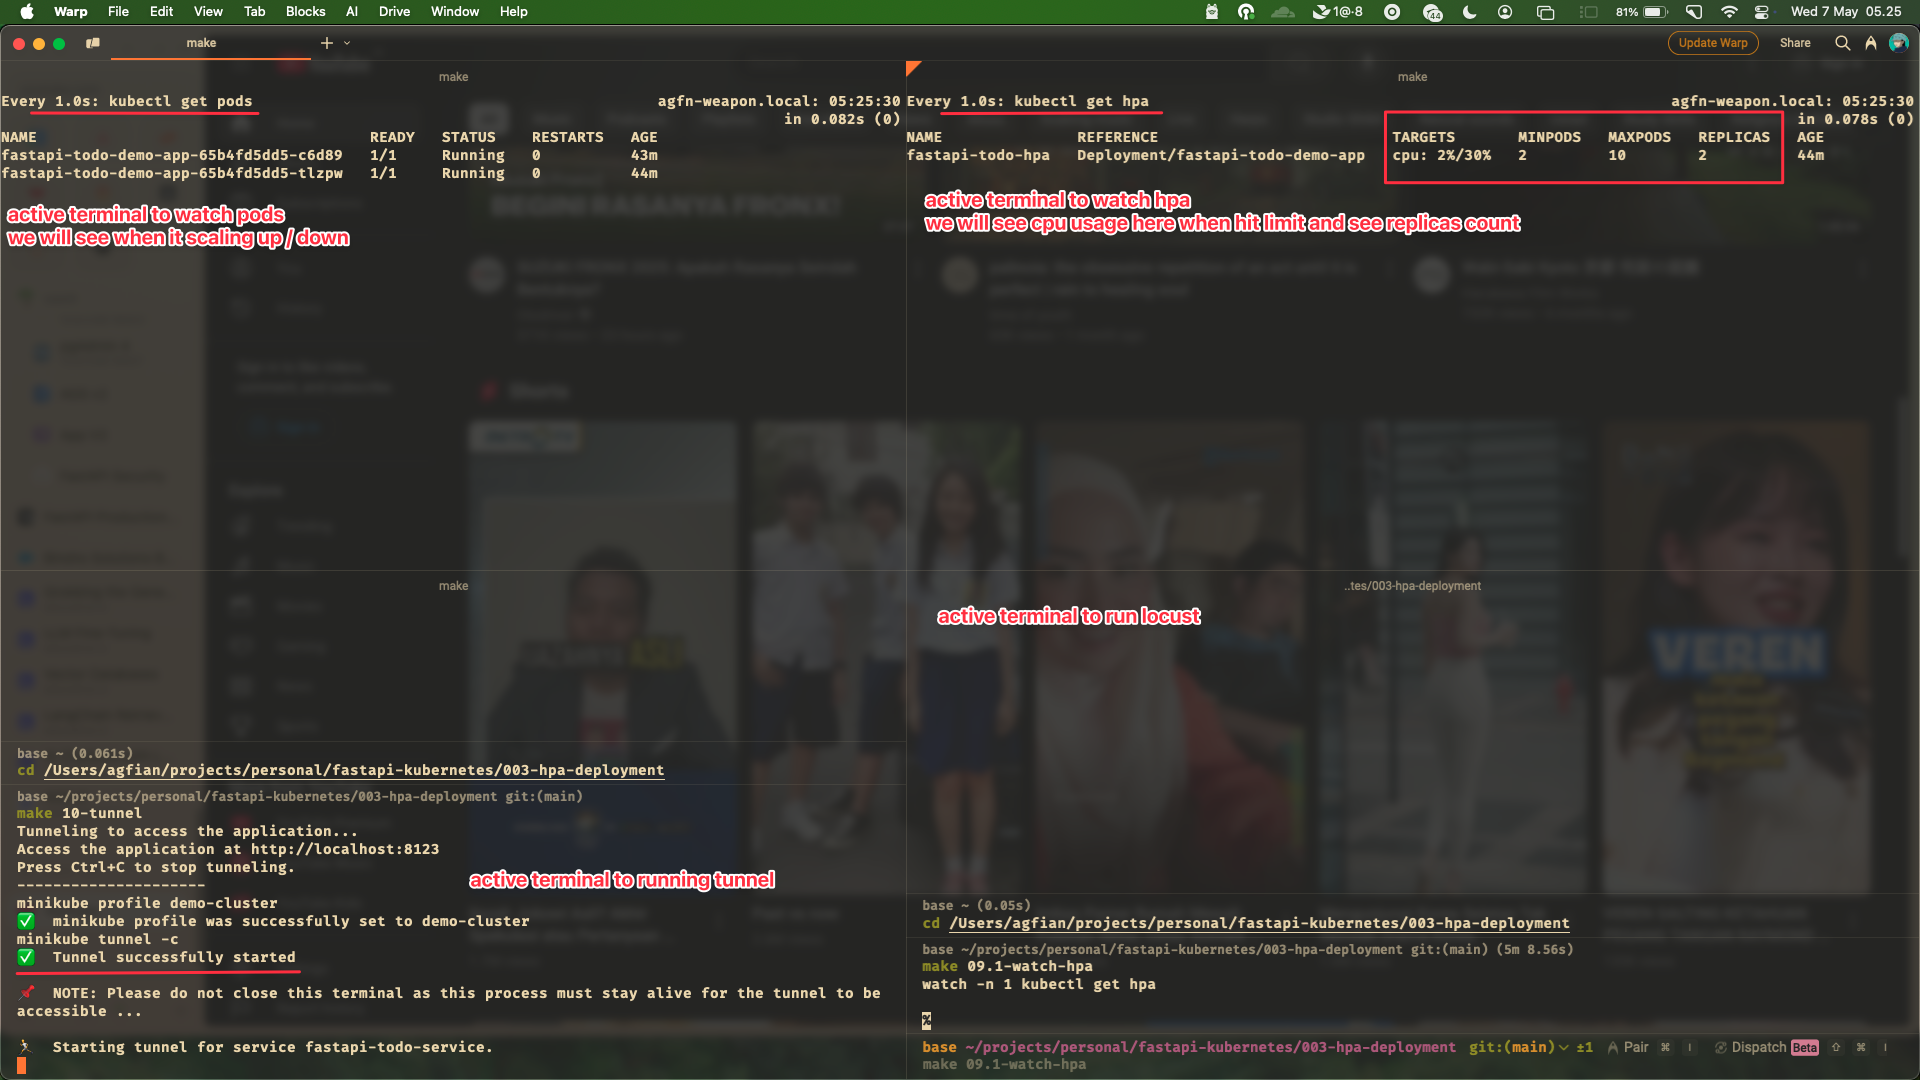
this is the setup for watching the HPA. Sorry for the background!
This is live demo of demo i upload to my youtube channel. You can watch the video below:
https://www.youtube.com/watch?v=GC9pNG4daGQ
For short, this is the timeline of the video:
- 1:44 pods already scale up
- 3:45 pods already scale down
just in case the video not work, this is the gif of the video.
Scale Up
Scale Down
Stop the Application
Alright! We already test the auto scaling and we can stop the application. We can stop the application by running this command:


Conclusion
In this project, we have learned how to deploy FastAPI application to Kubernetes and how to use HPA to scale the application based on CPU usage. We also learned how to use locust to generate load to the application and see how the HPA works. This is a simple project but it is very useful for learning Kubernetes and HPA.
Thanks for reading!