Hands-on FastAPI Simple Deployment with Kubernetes
Hi! back to my blog, today i will show you how to deploy a simple FastAPI that already pushed to Docker Hub and run it on Kubernetes. So let's get started!
Overview
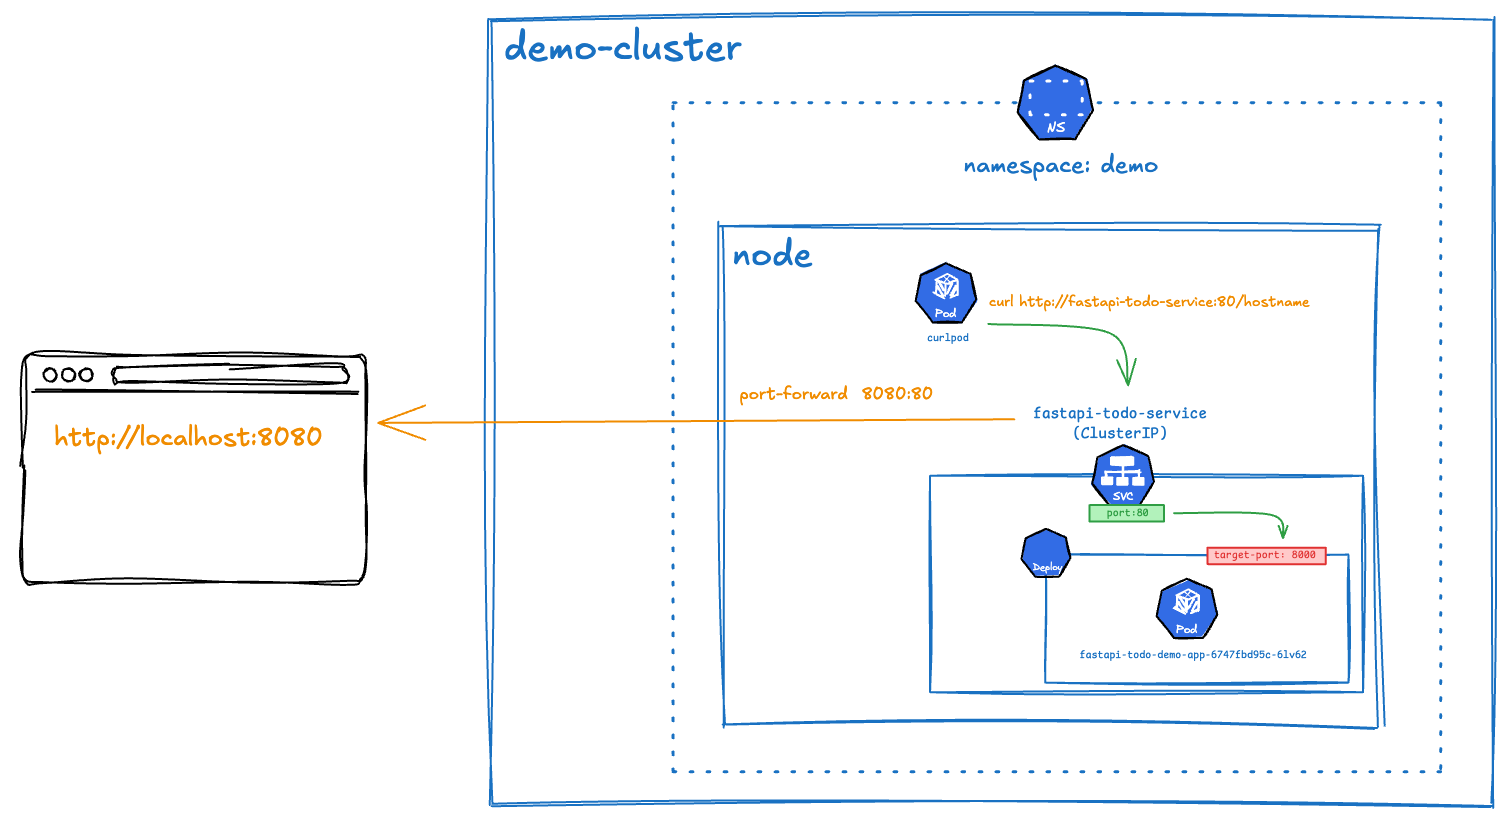
The diagram illustrates the flow of a request to access a FastAPI application deployed in a Kubernetes cluster using Minikube:
- Localhost: A request is made to
http://localhost:8080(e.g., via a browser or curl). - Port-Forwarding: The kubectl port-forward command forwards the request from localhost:8080 to port 80 of the fastapi-todo-service in the demo namespace.
- Service (
fastapi-todo-service): This Service, of type ClusterIP, listens on port 80 and routes the traffic to the target port 8000 on the Pod. - Pod (
fastapi-todo-demo-app): The Pod, namedfastapi-todo-demo-app-6747fbd95c-6lv62, runs the FastAPI application on port 8000, handling the request. - Namespace (
demo): The Service and Pod are isolated within the demo namespace in the demo-cluster Minikube cluster, ensuring separation from other resources. - Minikube Cluster (
demo-cluster): The entire setup runs on a Minikube cluster, a single-node Kubernetes environment on your machine.
This flow demonstrates how port-forwarding enables local access to the FastAPI application running inside the Kubernetes cluster.
Prerequisites
I am using MacOS and using OrbStack as my docker engine, you can use Docker Desktop or any other docker engine that you prefer. After that, i will install these tools:
Installation
minikube
Minikube is a user-friendly tool for running Kubernetes locally. It sets up a single-node Kubernetes cluster on your machine with minimal effort, typically using a VM or container (e.g., via Docker). You can also easily create a multi-node cluster, including both control-plane and worker nodes, all running on your local machine.
kubectl
kubectl is a command line tool for interacting with Kubernetes clusters. It allows you to run commands for example, to deploy applications, inspect and manage cluster resources, and view logs.
kubens
kubens is a command line utility that allows you to switch between Kubernetes namespaces quickly and easily. It is a part of the kubectl plugin ecosystem and is designed to work with kubectl to make it easier to manage multiple namespaces in a Kubernetes cluster.
for example, if you have multiple namespaces in your Kubernetes cluster, you can use kubens to switch between them without having to type the full namespace name each time. This can save you time and reduce the risk of errors when working with multiple namespaces.
Optional
Optional, kubens simplifies namespace switching.
kubectx
kubectx is a command line utility that allows you to switch between Kubernetes contexts easily. It is also part of the kubectl plugin ecosystem and helps manage multiple Kubernetes clusters.
for example, if you have multiple Kubernetes clusters (e.g., a development cluster and a production cluster), you can use kubectx to switch between them quickly without having to type the full context name each time. This can save you time and reduce the risk of errors when working with multiple clusters.
Optional
Optional, kubectx simplifies context switching.
Application
I have a simple FastAPI application that i will deploy to Kubernetes. The application is a simple REST API that returns a greeting message. You can find the code in this fastapi-todo-demo
and i have pushed the image to Docker Hub with the name syinx/fastapi-todo-demo:v0.0.23. You can see here fastapi-todo-demo
Create a Kubernetes Cluster
Now we will create a Kubernetes cluster using minikube. However this is shortlisted commands.
| Command | Description |
|---|---|
minikube profile list |
List all minikube profiles. |
minikube start |
Start the default cluster profile (minikube). |
minikube start --driver=docker --container-runtime=containerd --profile <name-profile> |
Start a cluster with a custom profile name using Docker as the driver and containerd as the runtime. |
minikube start --ha --driver=docker --container-runtime=containerd --profile <name-profile> |
Start a cluster with a custom profile name in high availability (HA) mode using Docker and containerd. |
minikube status |
Check the status of the default cluster. |
minikube status -p <name-profile> |
Check the status of a cluster with a custom profile name. |
minikube stop -p <name-profile> |
Stop a cluster with a custom profile name. |
minikube delete -p <name-profile> |
Delete a cluster with a custom profile name. |
minikube logs -p <name-profile> |
View logs for a cluster with a custom profile name. |
minikube node add <name-node> -p <name-profile> |
Add a node to a cluster with a custom profile name. |
minikube node delete <name-node> -p <name-profile> |
Delete a node from a cluster with a custom profile name. |
minikube node add --control-plane <name-node> -p <name-profile> |
Add a control plane node to a cluster with a custom profile name. |
minikube node delete --control-plane <name-node> -p <name-profile> |
Delete a control plane node from a cluster with a custom profile name. |
minikube start --driver=docker --container-runtime=containerd --profile demo-cluster

# output ---
# 😄  [demo-cluster] minikube v1.35.0 on Darwin 15.4 (arm64)
# ✨  Using the docker driver based on user configuration
# 📌  Using Docker Desktop driver with root privileges
# 👍  Starting "demo-cluster" primary control-plane node in "demo-cluster" cluster
# 🚜  Pulling base image v0.0.46 ...
# 🔥  Creating docker container (CPUs=2, Memory=4000MB) ...
# 📦  Preparing Kubernetes v1.32.0 on containerd 1.7.24 ...
#     ▪ Generating certificates and keys ...
#     ▪ Booting up control plane ...
#     ▪ Configuring RBAC rules ...
# 🔗  Configuring CNI (Container Networking Interface) ...
# 🔎  Verifying Kubernetes components...
#     ▪ Using image gcr.io/k8s-minikube/storage-provisioner:v5
# 🌟  Enabled addons: storage-provisioner, default-storageclass
# 🏄  Done! kubectl is now configured to use "demo-cluster" cluster and "default" namespace by default

output of minikube profile list command shows the list of all minikube profiles. The output shows the name of the profile, the status of the profile, the driver used, and the Kubernetes version and the active profile.
minikube status -p demo-cluster

# output ---
# demo-cluster
# type: Control Plane
# host: Running
# kubelet: Running
# apiserver: Running
# kubeconfig: Configured
Create a Namespace on Your Cluster Profile
Just imagine you have a folder. That's namespace. You can create multiple folders in your home directory. Each folder can contain files and subfolders. Similarly, in Kubernetes, a namespace is a way to organize and manage resources within a cluster. It allows you to create multiple isolated environments within the same cluster, making it easier to manage resources and avoid naming conflicts.
-
Create a namespace called
ordemoon your cluster profile -
See the list of namespaces
-
Switch to the
demonamespace usingkubens
Create a Deployment and Service object
Deployment
Deployment is one of the commonly used in Kubernetes. It is a higher-level abstraction that manages the deployment and scaling of a set of pods. A deployment allows you to define the desired state of your application, such as the number of replicas, the container image to use, and the ports to expose.
More Explanation
The YAML above defines a Deployment object named fastapi-todo-demo-app in the demo namespace. Here’s a breakdown of each part:
-
apiVersion: apps/v1
Specifies the Kubernetes API version used for this object. For Deployments,apps/v1is the standard version, supporting features like pod management and scaling. -
kind: Deployment
Indicates that this is a Deployment object, which manages a set of pods and ensures they match the desired state. -
metadata
Contains metadata about the Deployment, such as its name and namespace:namespace: demo: Places the Deployment in thedemonamespace, isolating it from other resources in the cluster.name: fastapi-todo-demo-app: Assigns a unique name to the Deployment.labels: Key-value pairs (app.kubernetes.io/nameandapp.kubernetes.io/instance) used to identify and organize the Deployment. These labels can be used by other Kubernetes objects (e.g., Services) to reference this Deployment.
-
spec
Defines the desired state of the Deployment:selector
Specifies which pods this Deployment manages using a label selector:matchLabels: Matches pods with the labelsapp.kubernetes.io/name: fastapi-todo-demo-appandapp.kubernetes.io/instance: fastapi-todo-demo-app. This ensures the Deployment controls only the pods it creates.
template
Defines the pod template used to create pods managed by this Deployment:metadata.labels: Assigns the same labels (app.kubernetes.io/nameandapp.kubernetes.io/instance) to the pods, ensuring they match theselector.spec
Describes the pod’s configuration:containers: A list of containers to run in each pod. Here, there’s one container:name: fastapi-todo: A unique name for the container.image: syinx/fastapi-todo-demo:v0.0.23: Specifies the Docker image to use, pulled from Docker Hub.resources
Defines resource requests and limits to control the container’s CPU and memory usage:limits: Caps the maximum resources the container can use (128Mimemory and500mCPU, where500mis half a CPU core).requests: Specifies the minimum resources the container needs (64Mimemory and250mCPU). Requests help Kubernetes schedule pods efficiently.
ports
Lists the ports the container exposes:containerPort: 8000: Indicates the container listens on port 8000, where the FastAPI application runs.
Service
Service is an object acts as a gateway, enabling network access to a group of pods (containers) within a cluster.
| fastapi-todo-demo-service.yaml | |
|---|---|
More Explanation
The YAML above defines a Service object named fastapi-todo-service in the demo namespace. Here’s a breakdown of each part:
-
apiVersion: v1
Specifies the Kubernetes API version used for this object. For Services,v1is the standard version. -
kind: Service
Indicates that this is a Service object, which provides network access to pods. -
metadata
Contains metadata about the Service:namespace: demo: Places the Service in thedemonamespace.name: fastapi-todo-service: Assigns a unique name to the Service.
-
spec
Defines the desired state of the Service:selector
Specifies which pods this Service targets using a label selector:app.kubernetes.io/name: fastapi-todo-demo-appandapp.kubernetes.io/instance: fastapi-todo-demo-app: Matches pods with these labels, linking the Service to the pods created by the Deployment.
ports
Defines the port configuration for the Service:protocol: TCP: Specifies that the Service uses the TCP protocol.port: 80: The port where the Service is accessible within the cluster.targetPort: 8000: The port on the target pods where traffic is forwarded (the FastAPI app listens on port 8000).
type: ClusterIP
Specifies the type of Service:ClusterIP: The default Service type, assigning a cluster-internal IP address. This makes the Service accessible only within the cluster, ideal for internal communication between pods.- Other types (not used here):
NodePort: Exposes the Service on a static port on each node’s IP, useful for external access during development.LoadBalancer: Exposes the Service externally via a cloud provider’s load balancer, common in production cloud environments.ExternalName: Maps the Service to an external DNS name without proxying, used for integrating external services.
Alternative
or, you can combine both YAMLs into a single file (fastapi-todo-demo.yaml) and apply them together. Here i will use this to continue the tutorial.
Apply the Configuration
kubectl apply -f fastapi-todo-demo.yaml

# output ---
# deployment.apps/fastapi-todo-demo-app created
# service/fastapi-todo-service created
or when you have separate YAML files, you can apply them separately:
kubectl apply -f fastapi-todo-demo-deployment.yaml
kubectl apply -f fastapi-todo-demo-service.yaml
Check the Deployment
# remember we are already in demo namespace with kubens "demo"
kubectl get pods -owide

# output ---
# NAME                                     READY   STATUS    RESTARTS   AGE   IP           NODE           NOMINATED NODE   READINESS GATES
# fastapi-todo-demo-app-6747fbd95c-6lv62   1/1     Running   0          75s   10.244.0.3   demo-cluster   <none>           <none>
Check the service
kubectl get services -owide

# output ---
# NAME                   TYPE        CLUSTER-IP       EXTERNAL-IP   PORT(S)   AGE    SELECTOR
# fastapi-todo-service   ClusterIP   10.111.118.189   <none>        80/TCP    2m7s   app.kubernetes.io/instance=fastapi-todo-demo-app,app.kubernetes.io/name=fastapi-todo-demo-app
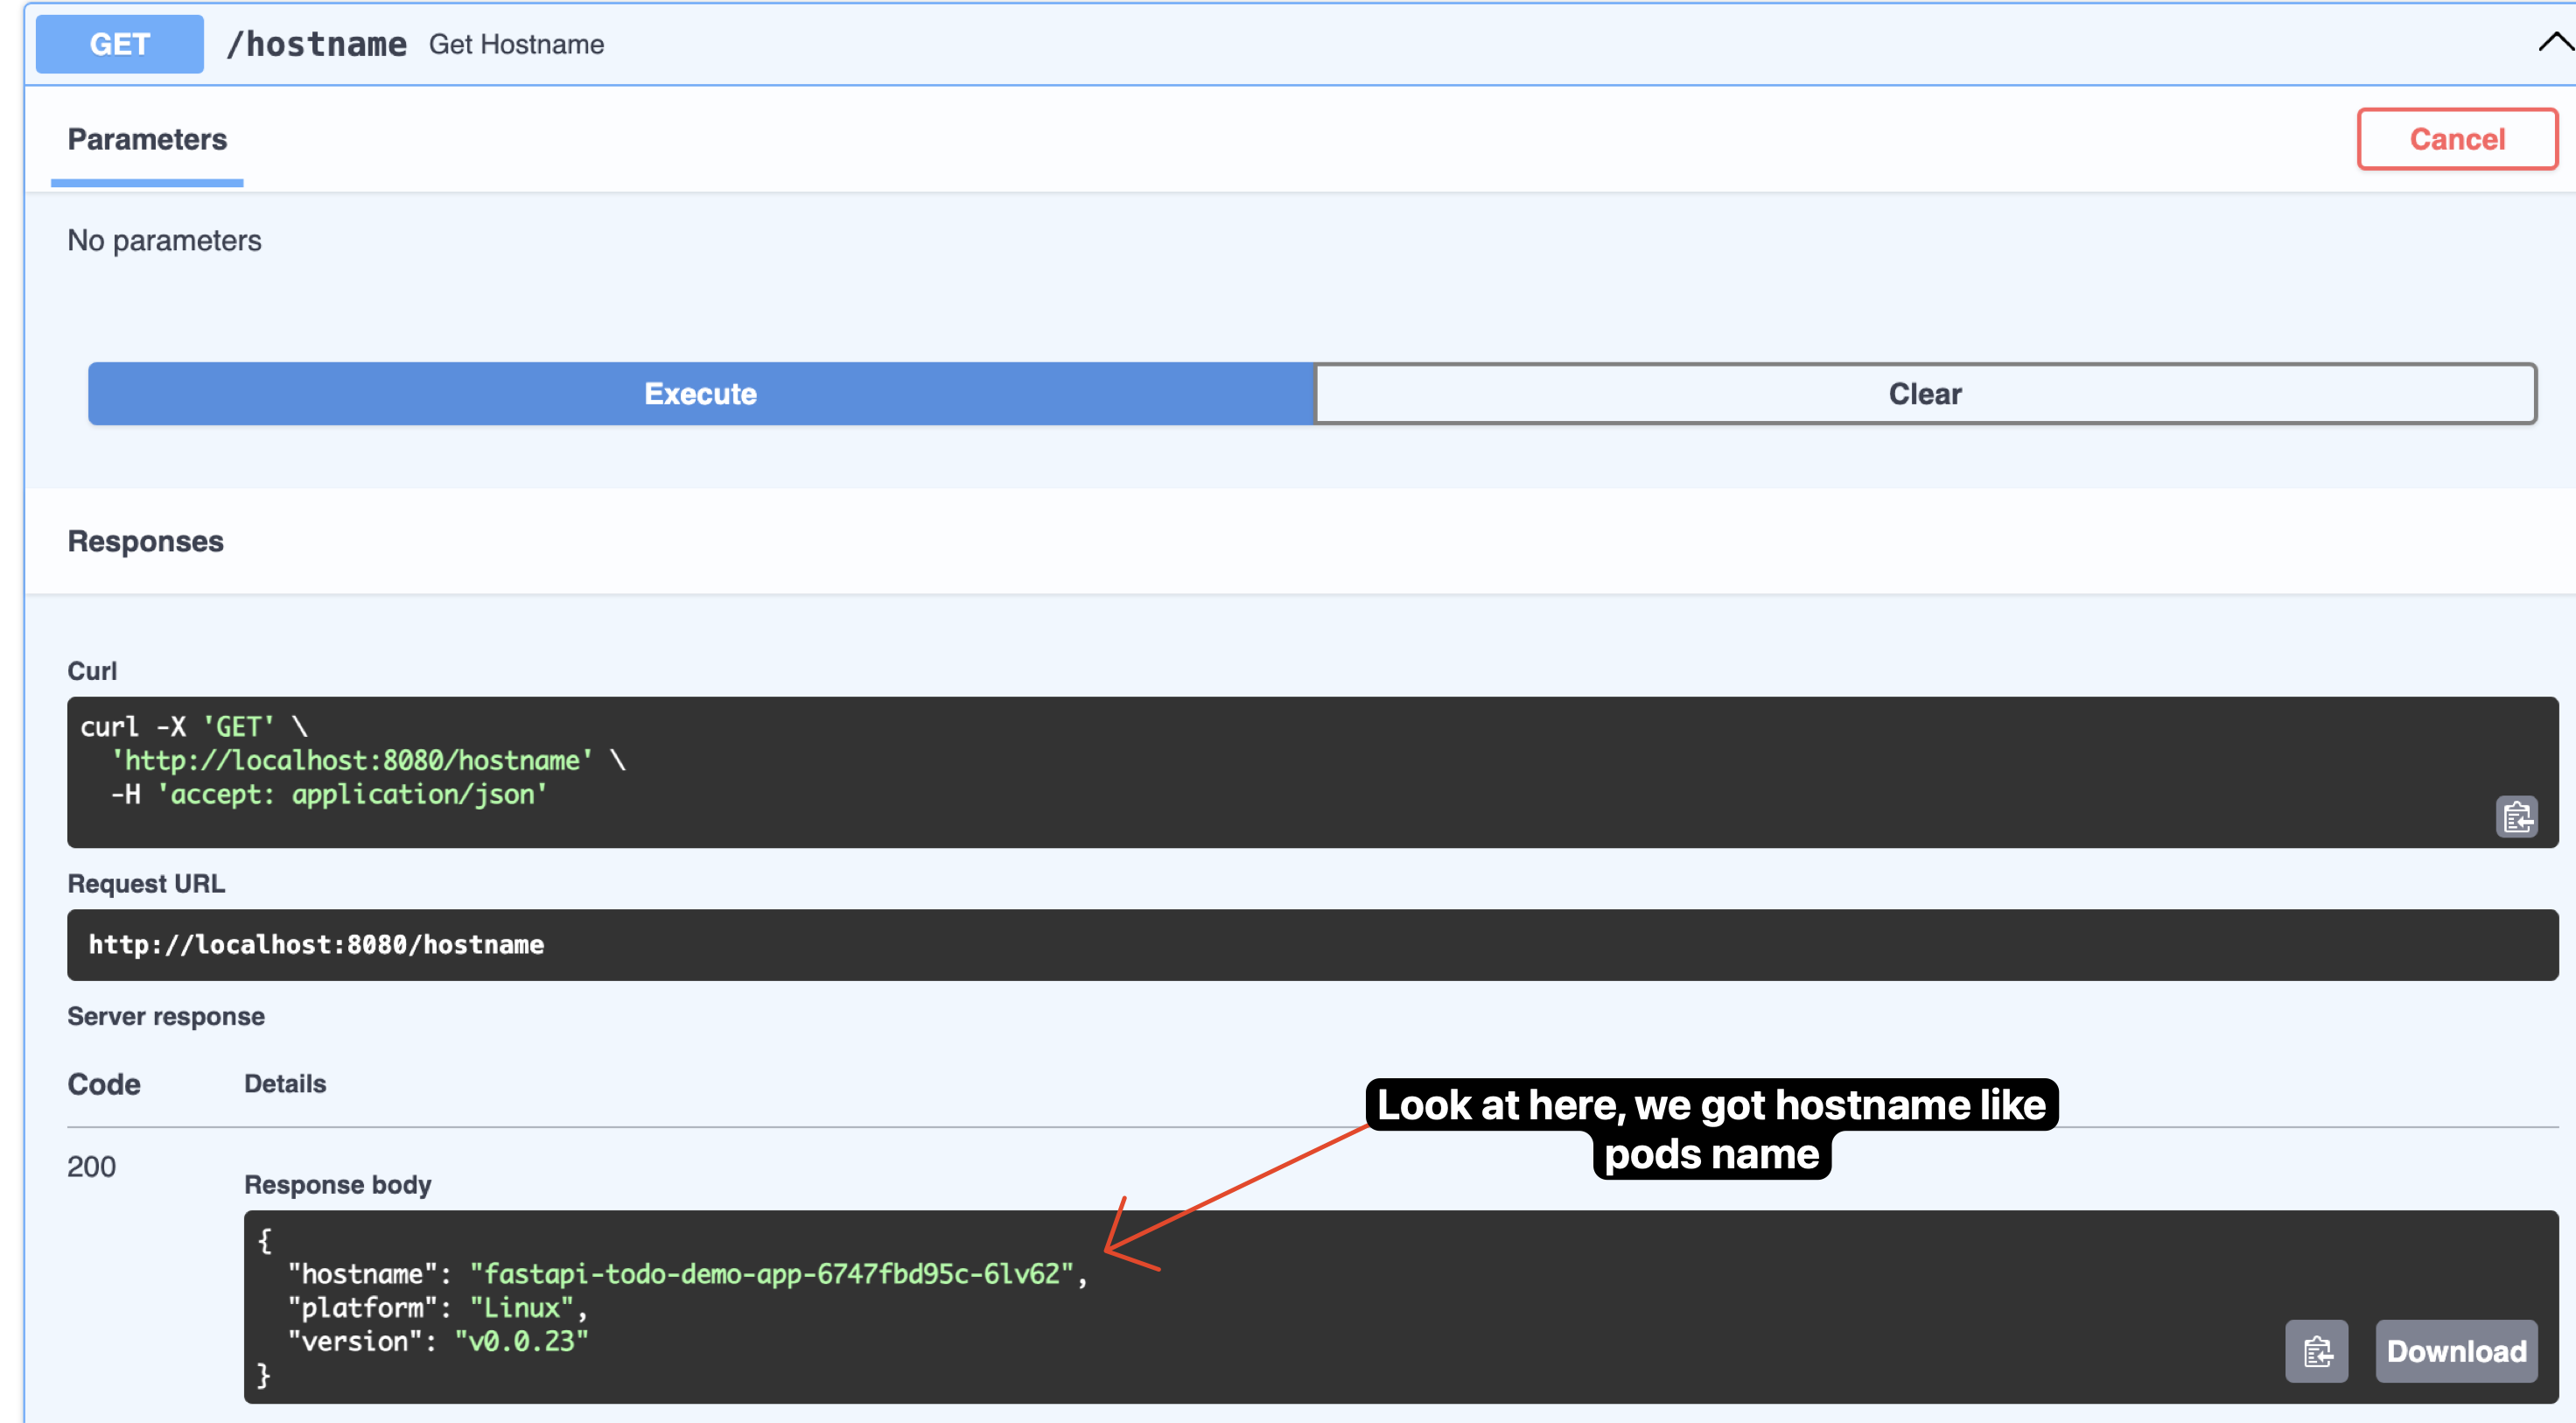
Verify the deployment and service
Since the service is of type ClusterIP, it is only accessible from within the cluster. To verify that the service is working correctly, you can use a temporary pod with curl to access the service. So, basically we create a pod with the same cluster and namespace as the service.

we curl name of the service fastapi-todo-service and the port 80 to access the service. The output shows that the service is working correctly and returning the expected response from the FastAPI application.
Check the logs
kubectl logs fastapi-todo-demo-app-6747fbd95c-6lv62 # remember pod regularly change
# or using label selector
kubectl logs -l app.kubernetes.io/name=fastapi-todo-demo-app

# output ---
# kubectl logs fastapi-todo-demo-app-6747fbd95c-6lv62
# INFO:     Started server process [1]
# INFO:     Waiting for application startup.
# INFO:     Application startup complete.
# INFO:     Uvicorn running on http://0.0.0.0:8000 (Press CTRL+C to quit)
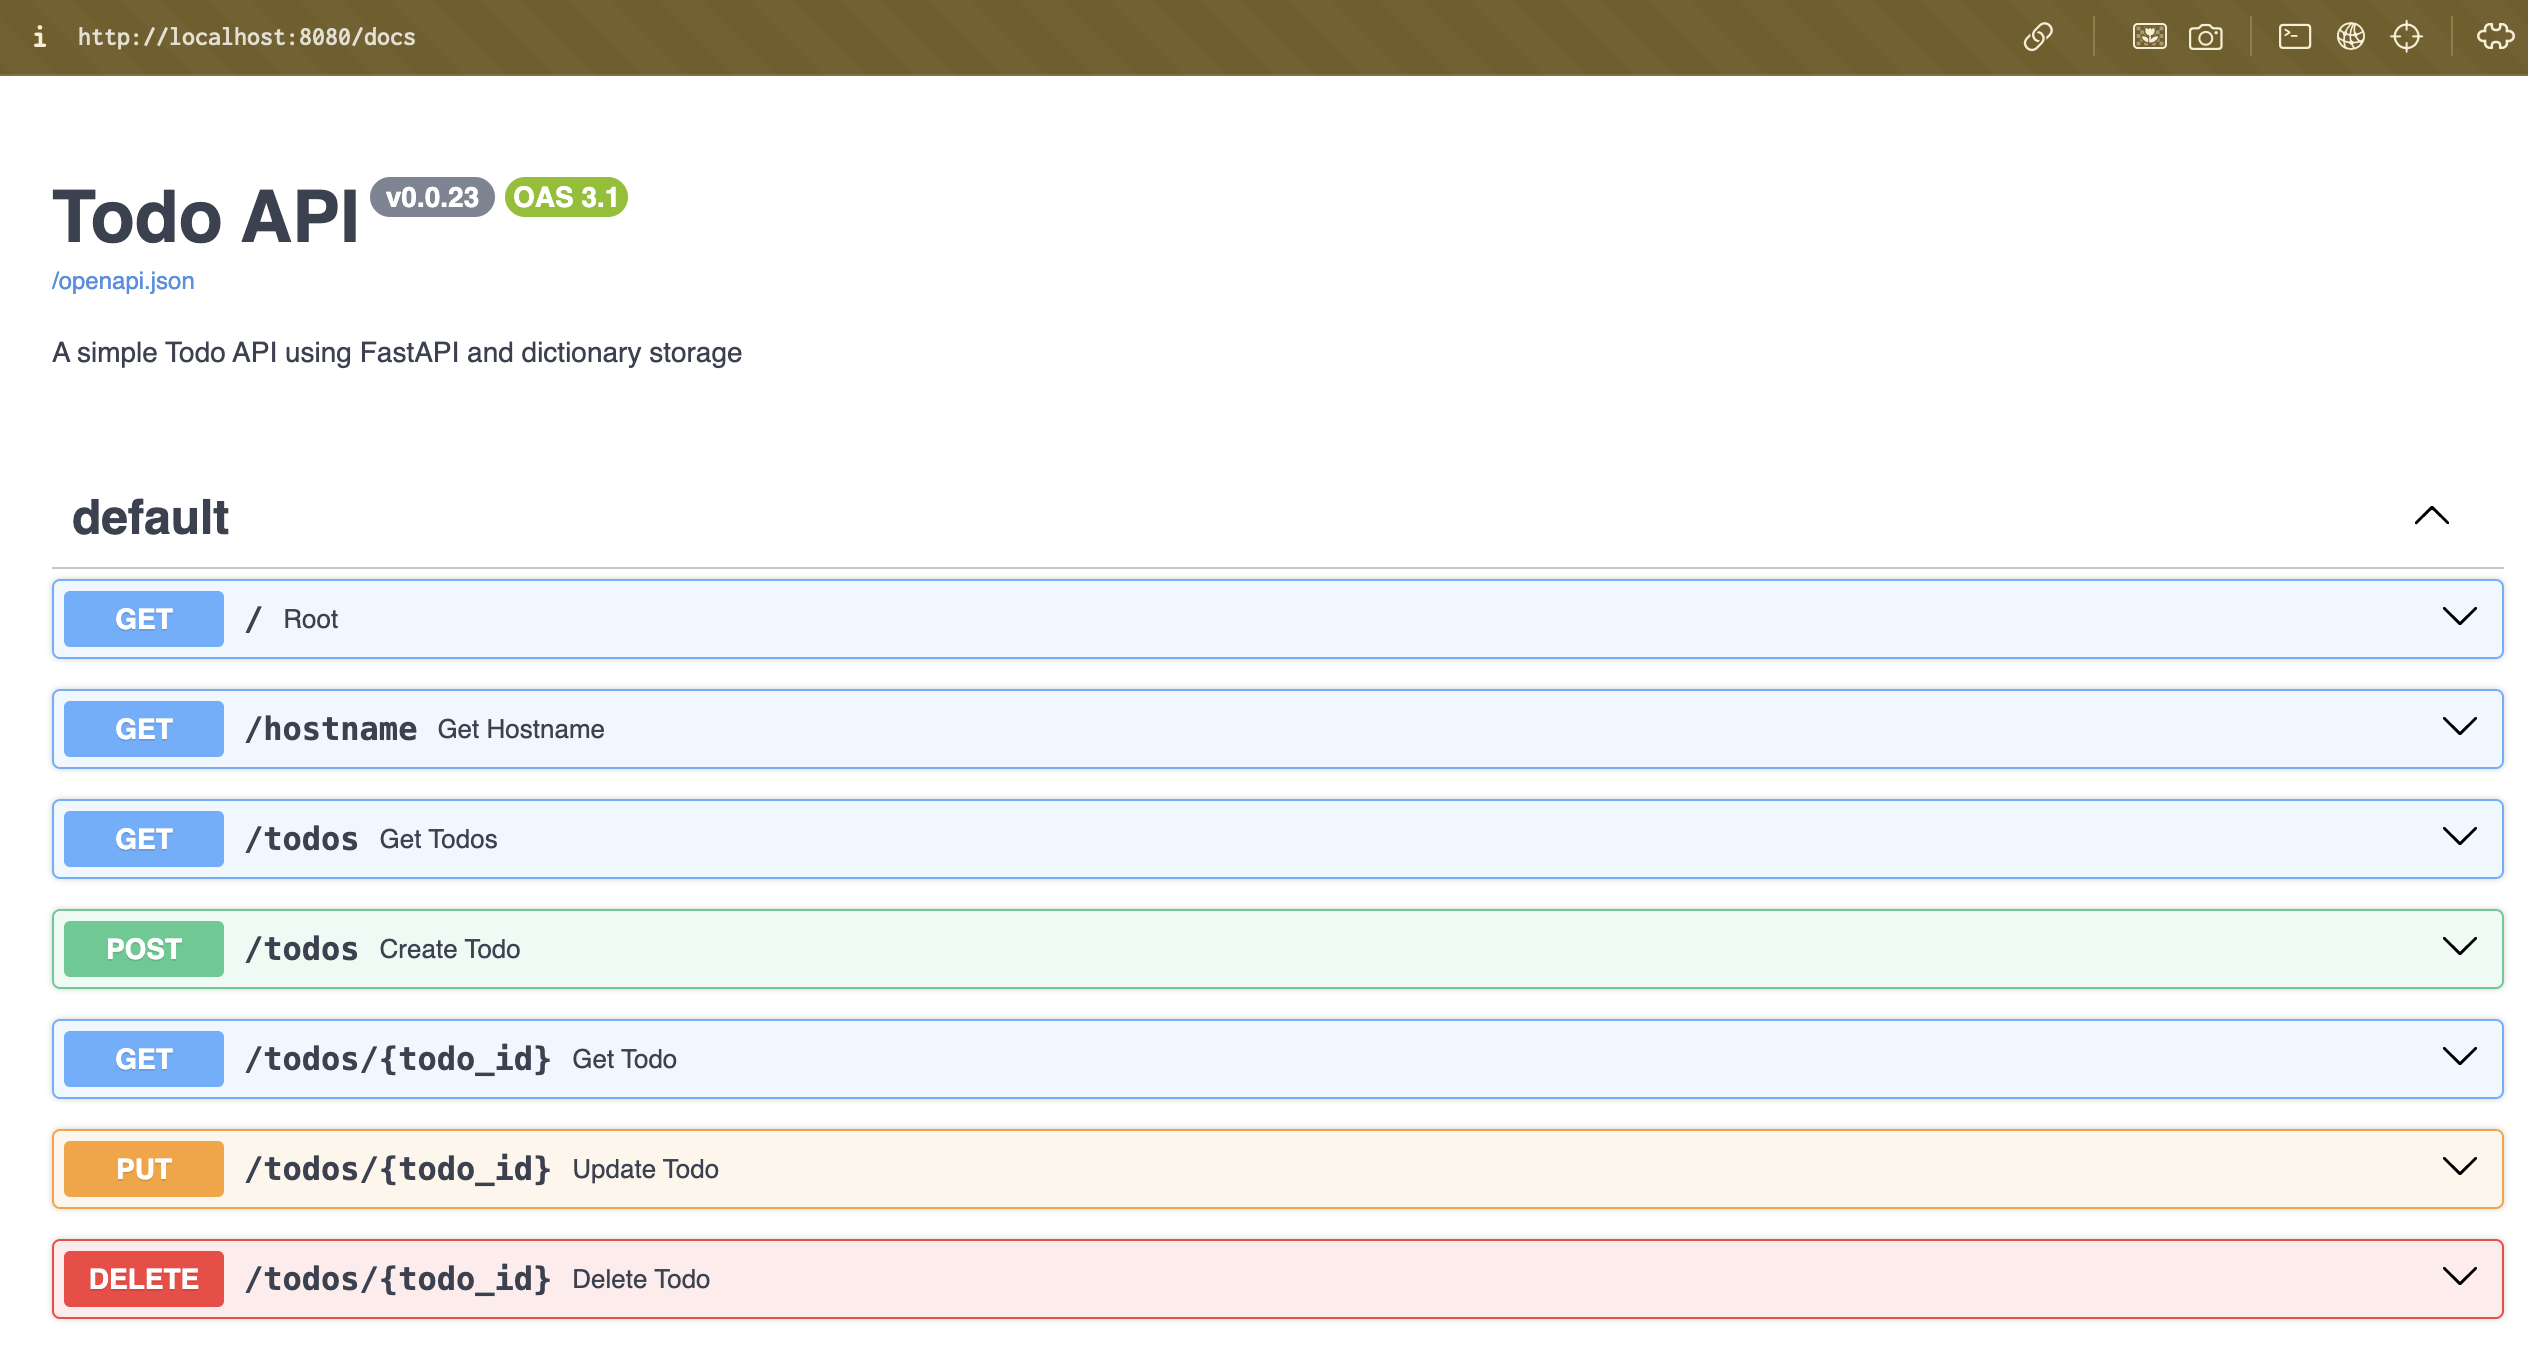
Check the deployment with port-forward
port-forwarding is a way to access a service running in a Kubernetes cluster from your local machine. It allows you to forward traffic from a local port to a port on a pod or service in the cluster.
kubectl port-forward service/fastapi-todo-service 8080:80

# output ---
# Forwarding from 127.0.0.1:8080 -> 8000
# Forwarding from [::1]:8080 -> 8000
# (running ... don't close this terminal if you want to access the service)
Stop Minikube
After you are done with the deployment, you can stop the minikube cluster to free up resources. You can do this by running the following command:
minikube stop -p demo-cluster

# output ---
# ✋  Stopping node "demo-cluster"  ...
# 🛑  Powering off "demo-cluster" via SSH ...
# 🛑  1 node stopped.
Conclusion
in this blog post, i have shown you how to deploy a simple FastAPI application to Kubernetes using minikube. I have also shown you how to create a deployment object and a service object to expose the application. You can use this as a starting point for deploying your own applications to Kubernetes.
Question
Next, how to do auto scaling and load balancing? Stay tuned!
If you have any questions or feedback, please leave a comment below. Thank you for reading!