Hands-On Gitlab CI/CD
Hi there! Today, I will demonstrate a hands-on implementation of GitLab CI/CD. This might be a bit overkill as I will also install a GitLab server. First, i will to install self-hosted gitlab server. Second, i will create simple fastapi-app and that deployed instance here. All instances will be deployed on GCP and will be managed using Terraform. Last, i will create CI/CD pipeline to deploy fastapi-app to GCP using gitlab ci/cd.
Introduction
 The diagram illustrates two separate infrastructures: one for a GitLab server (
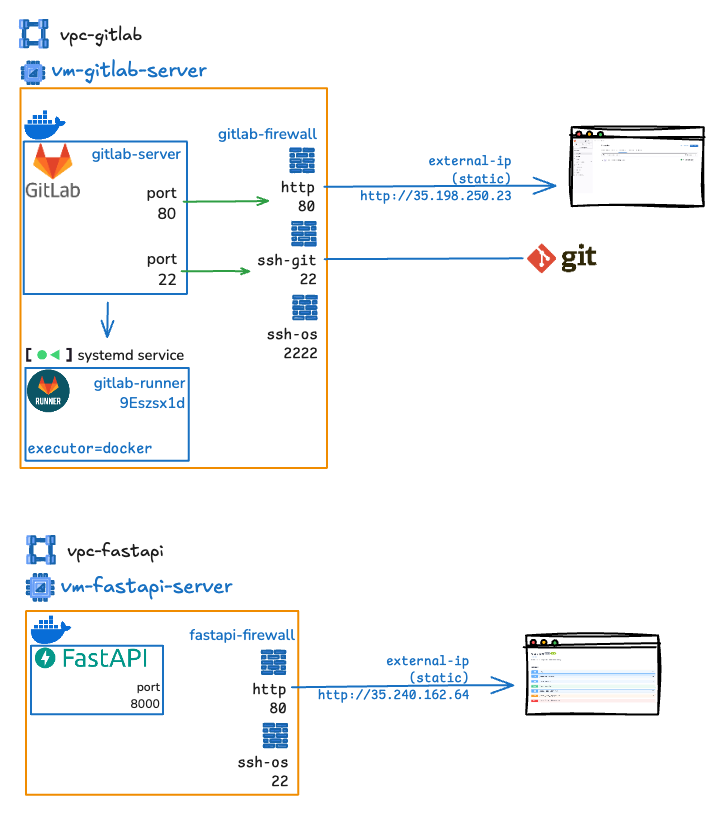
vpc-gitlab) and another for a FastAPI server (vpc-fastapi). Both setups are hosted in virtual private clouds (VPCs) with Docker containers, firewalls, and specific port mappings for external access. Here's a breakdown of each:
1. GitLab Infrastructure (vpc-gitlab)
This server is designed to host a self-managed GitLab instance, which includes a GitLab server and a GitLab Runner for CI/CD pipelines. It is configured to allow external access through specific ports.
-
Components:
-
Gitlab Server (
vm-gitlab-server):- Runs a Gitlab Server instance inside a Docker container (
gitlab/gitlab-ce:latest). - Runs a Gitlab Runner using systemd service and uses Docker as the executor for Gitlab Runner, which handles CI/CD pipelines.
- Exposes two services:
- HTTP: Port 80 internally, mapped to external port 80.
- SSH:
- Port 22 internally, mapped to external port 22 for
ssh-git - Port 2222 for
ssh-osso that the server can be accessed via SSH.
- Port 22 internally, mapped to external port 22 for
Why use port 2222 as
ssh-os?Port 2222 is used to avoid conflict with the default SSH port (22) used by the GitLab server. This allows for separate access for Git operations and server management. So, the user will be more naturally to git clone using ssh gitlab without additional port specification.
- Runs a Gitlab Server instance inside a Docker container (
-
Firewall (
gitlab-firewall):- Sits between the GitLab server and external access.
- Filters traffic to ensure only allowed ports (80, 22, 2222) are accessible.
- External Access:
- The GitLab instance is accessed via a static external IP (
35.198.250.23). - HTTP traffic (e.g., web interface) goes through port 80.
- Git operations (e.g., cloning, pushing) use SSH on port 22.
- Additional SSH access (likely for OS-level operations) is on port 2222.
- The GitLab instance is accessed via a static external IP (
- Systemd Service:
- A
systemdservice (gitlab-runner) manages the GitLab Runner, ensuring it runs persistently. - The GitLab Runner is configured to automatically start on boot
- A
-
-
Workflow:
- External users access the GitLab web interface via
http://35.198.250.23:80. - Developers interact with Git repositories using SSH (
ssh-git) on port 22. - Admins may access the server itself via SSH (
ssh-os) on port 2222 for maintenance.
- External users access the GitLab web interface via
2. FastAPI Infrastructure (vpc-fastapi)
The code for terraform this provisioning can be found provisioning fastapi-server.
This server is designed as target deployment for CI/CD Pipeline fastapi-app. It runs a FastAPI application and is set up to allow external access through specific ports.
-
Components:
- FastAPI Server (
vm-fastapi-server):- Runs a FastAPI application inside a Docker container.
- Exposes two services:
- HTTP: Port 8000 internally, mapped to external port 80.
- SSH (for OS access): Port 22 internally, mapped to external port 22.
- Firewall (
fastapi-firewall):- Filters traffic, allowing only ports 80 and 22 for external access.
- External Access:
- The FastAPI application is accessed via a static external IP (
35.240.162.64). - HTTP traffic (e.g., API requests) goes through port 80.
- SSH access for server management is on port 22.
- The FastAPI application is accessed via a static external IP (
- FastAPI Server (
-
Workflow:
- External users interact with the FastAPI application via
http://35.240.162.64:80. - Admins can access the server via SSH on port 22 for maintenance.
- External users interact with the FastAPI application via
Tech Stack
| Technology | Purpose |
|---|---|
| GitLab CI/CD | For continuous integration and deployment |
| GCP | Google Cloud Platform for hosting the infrastructure |
| Terraform | For infrastructure as code (IaC) to provision and manage resources |
| Docker | For containerization of applications |
| FastAPI | For building the web application |
| Python | Programming language for the FastAPI application |
| Makefile | For build and test commands |
Codes
Install Self-hosted Gitlab
Warning
if you directly use gitlab.com, you can skip this section. No judgment here. But if you want to learn how to self-host GitLab, this section is for you.
In this section, I will install self-hosted GitLab CI/CD. I will use GCP as the cloud provider and Terraform to manage the infrastructure. I used terraform to spin up:
- 1x GCP VM instance
e2-standard-2(used as GitLab server and GitLab runner) - 1x VPC network
- 1x subnet
- 1x firewall rule (allowing port 80, 22, and 2222)
- 1x static IP address: so i could find my gitlab server easily
The code for terraform can be found provisioning gitlab-server.
startup_gitlab.sh
The following script is used to install GitLab server on GCP VM instance. It will be executed when the VM instance is created. The script will install Docker, Docker Compose, and GitLab server using Docker.
Setup GitLab Server
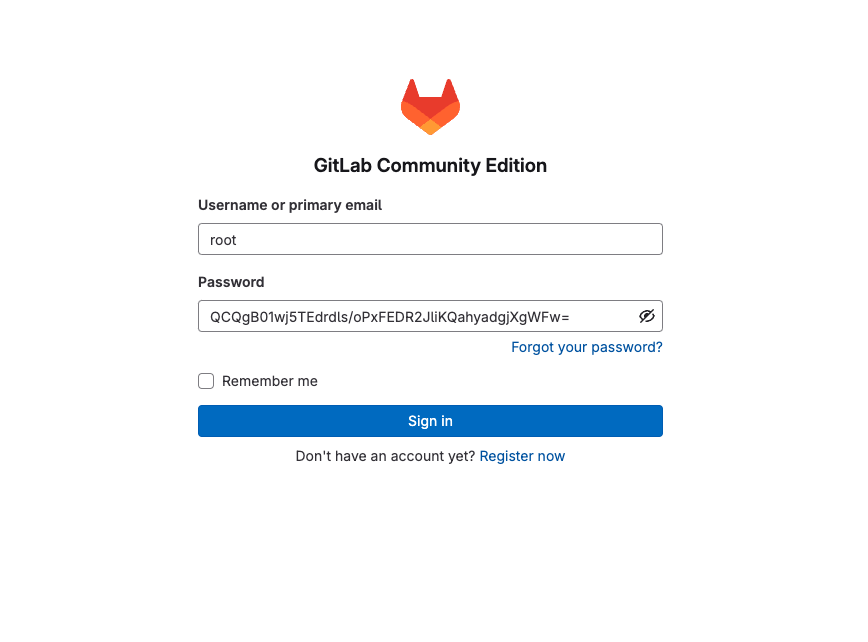
after installing GitLab server, and got root password:
-
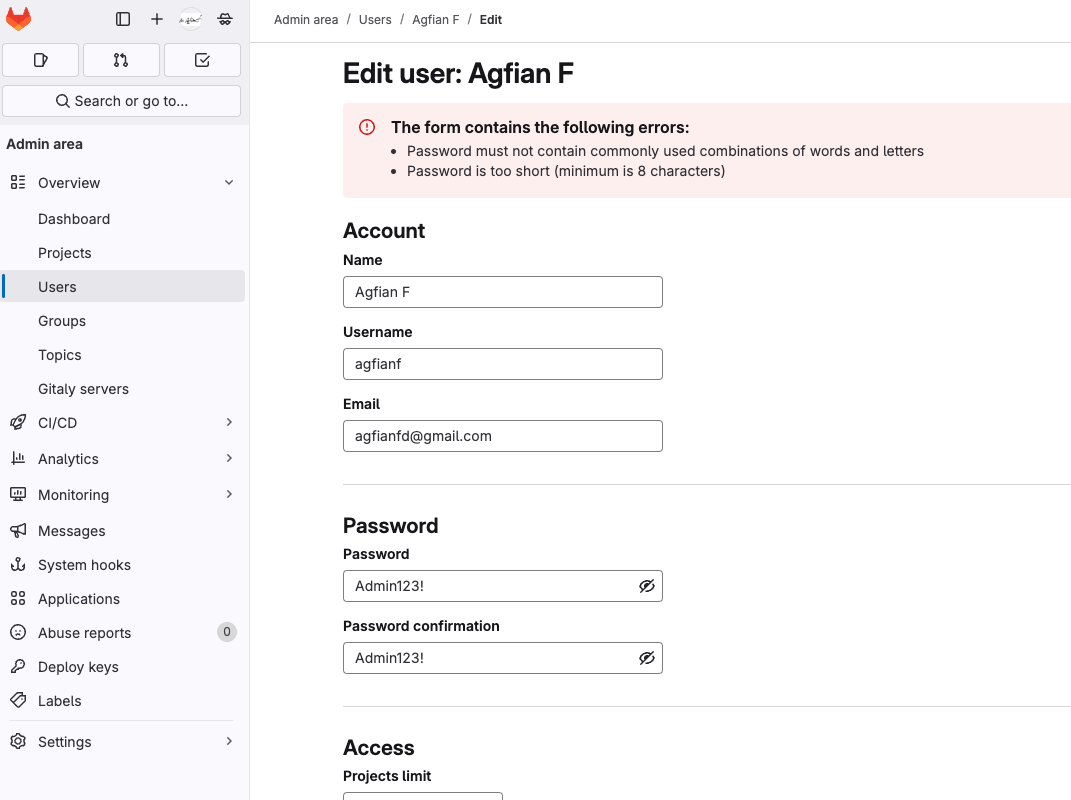
Create user gitlab-admin
-
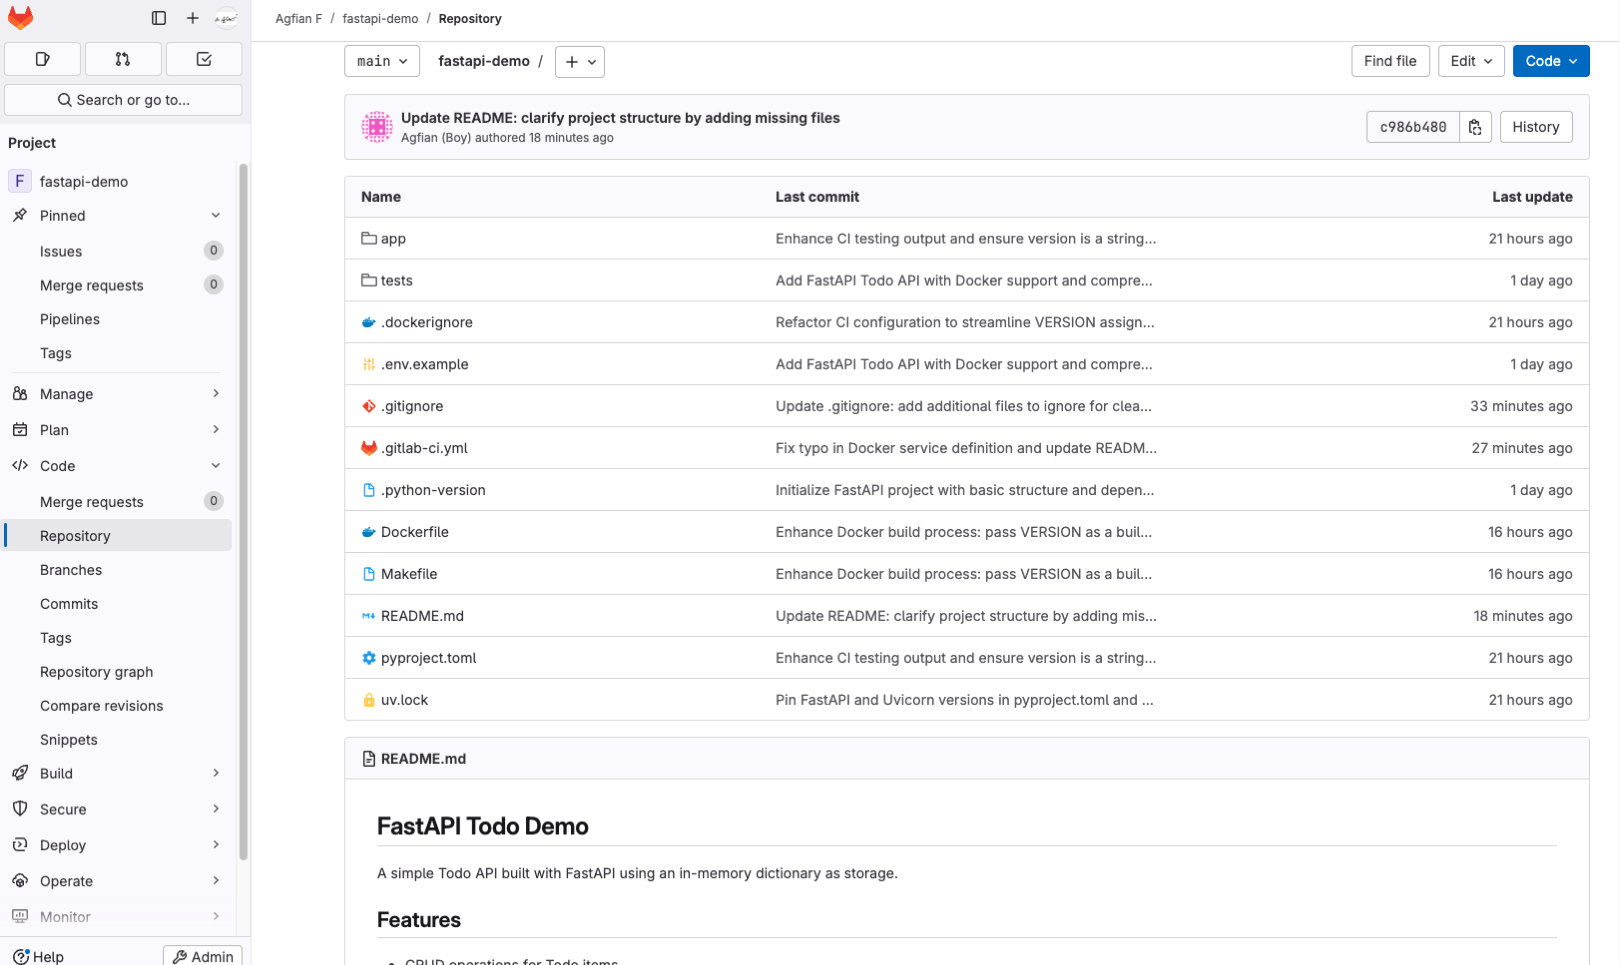
Create project fastapi-app
Setup Gitlab Runner
-
Create GitLab runner [on Gitlab UI]
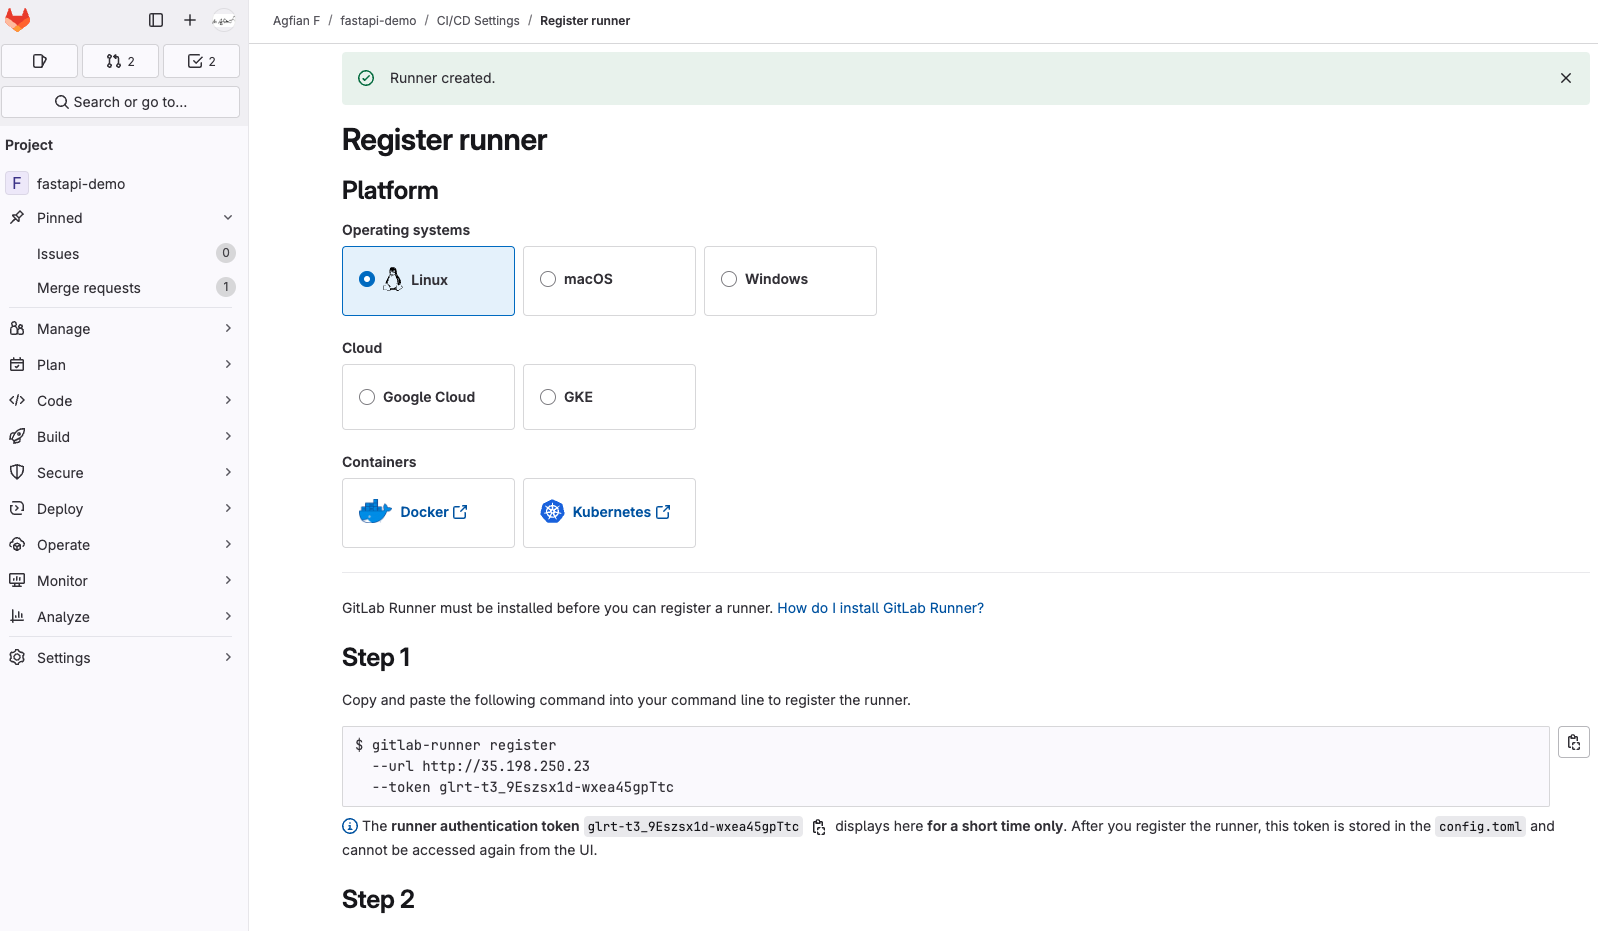
-
Register GitLab runner [on FastAPI Server]
First, we need to install gitlab runner on the FastAPI server. You can use the following command to install GitLab runner:
Install GitLab Runner Then, register the GitLab runner using the token that you got from the GitLab UI. You can use the following command to register the GitLab runner:
Register GitLab Runner Then, we check the configuration of the GitLab runner. You can use the following command to check the configuration:
-
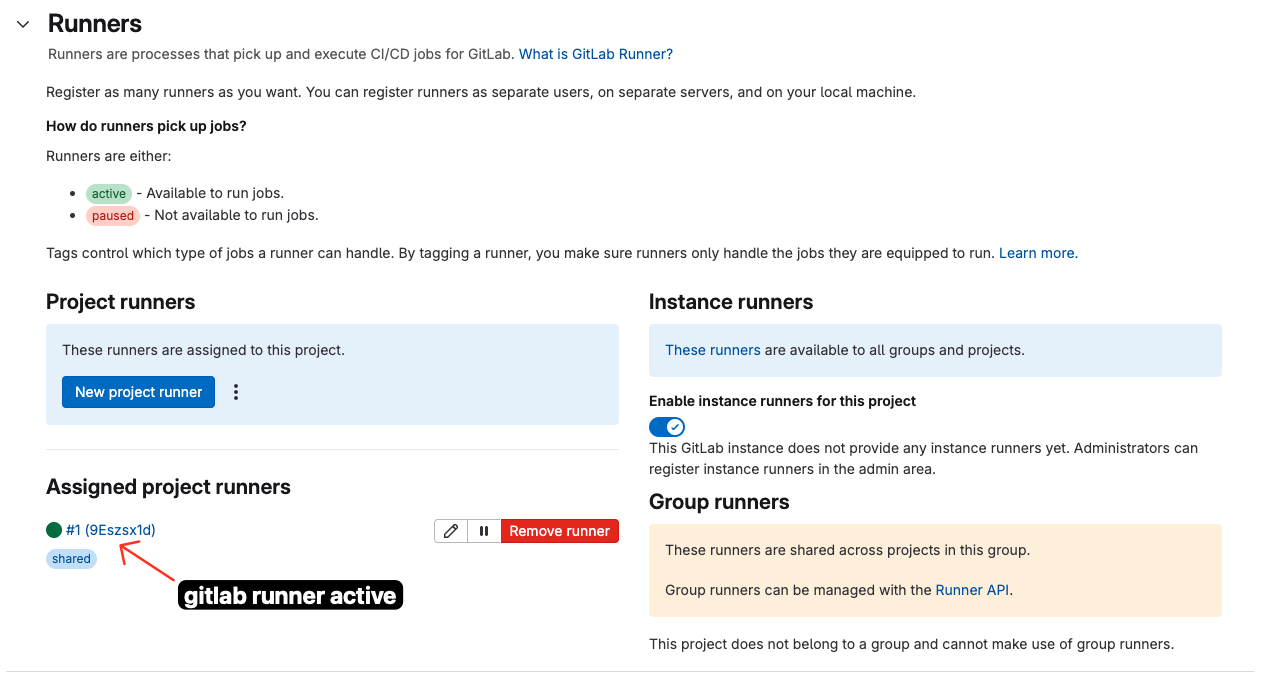
Create systemd service
systemd service to run the service, run the following command:systemd service systemd service This screenshot shows the status of the Gitlab runner:

Create Simple FastAPI App
This is a simple FastAPI app that will be deployed to GCP. This full code fastapi-todo-demo
Project Structure
fastapi-demo/
├── app/
│   └── main.py       # FastAPI application
├── tests/
│   └── test_main.py  # Tests for the API
├── Dockerfile        # Dockerfile for building the image
├── .gitignore
├── .gitlab-ci.yml    # GitLab CI/CD pipeline configuration
├── pyproject.toml    # Project configuration
├── Makefile          # Makefile for build and test commands
└── README.md         # This file
API Endpoints
| Endpoint | Method | Description |
|---|---|---|
/ |
GET | Root will redirect to the API documentation /docs |
/hostname |
GET | Get the hostname of the server |
/todos |
POST | Create a new todo |
/todos |
GET | List all todos |
/todos/{todo_id} |
GET | Get a specific todo |
/todos/{todo_id} |
PUT | Update a todo |
/todos/{todo_id} |
DELETE | Delete a todo |
Makefile
the Makefile is used to build and test the application. The following are the commands that can be run using the Makefile:
Makefile
example to build and push the Docker image to Docker Hub:
Command to build and push Docker image using Makefile
Run FastAPI App
This is Todo API - Swagger UI:

Create CI/CD Pipeline
1. Prepare Your Deployment Server
Since we are already using terraform to provision the deployment server, this is already prepared in the startup_fastapi.sh script. This script will be executed when the VM instance is created. The script will install Docker and docker-compose on the VM instance and run the FastAPI application using Docker.
Why do we need to install Docker?
Because we will ssh to this server and run the Docker container using SSH. So we need to install Docker on this server. it will make our deployment easier.
docker-compose is optional.
startup_fastapi.sh
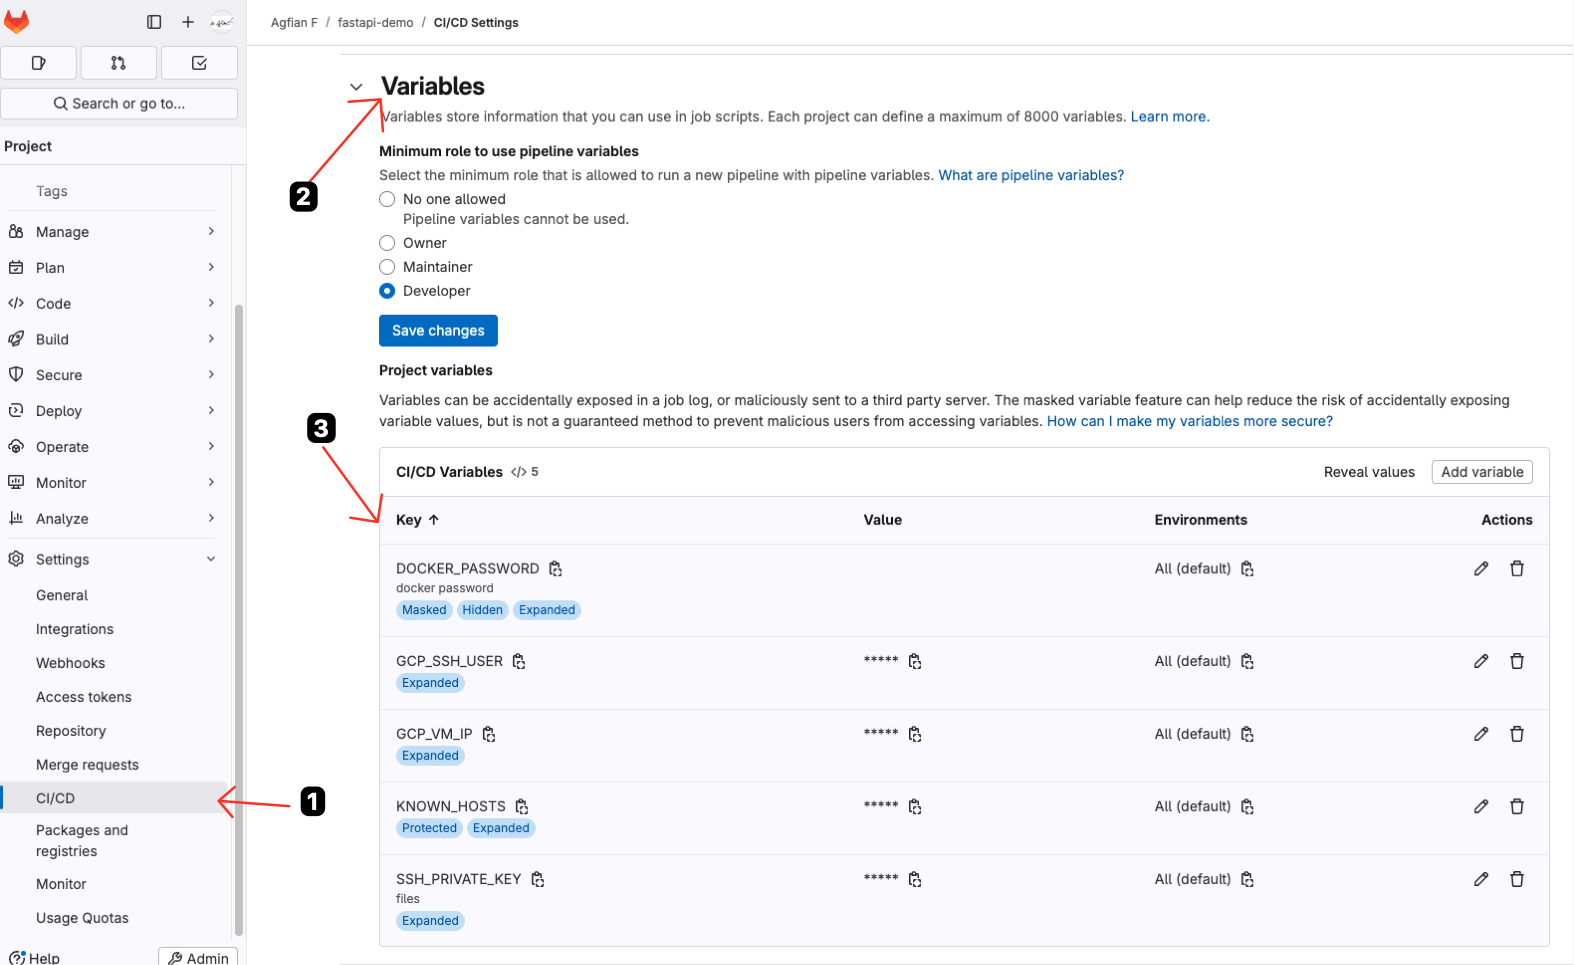
2. Create Variables
Go to your GitLab project, and then go to Settings > CI/CD > Variables and create the following variables:
3. Create GitLab CI/CD files
The following code is the GitLab CI/CD pipeline that will be used to build and deploy the application.
Basic Gitlab CI/CD Pipeline
each job of the pipeline will run in a separate container. The following is the basic structure of the GitLab CI/CD pipeline:
| Parameter | Description |
|---|---|
| stage | The stage that this job will run in the pipeline |
| image | The Docker image that will be used to run this job |
| tags | The tags used for choosing the appropriate runner |
| before_script | Commands that will run before the main job, usually used to install dependencies |
| script | The main commands that will be executed in this job |
| services | Additional Docker images that will be used alongside the main job container |
| rules | Conditions that determine when this job should run or be skipped |
What is the difference between rules and only?
rules is more flexible than only, because rules can be used to run this job only on certain conditions, while only can only be used to run this job on certain branches or tags. So, if you want to run this job only on certain conditions, you can use rules. If you want to run this job on certain branches or tags, you can use only.
Why we need services in build_and_push job?
Because we need services in the build_and_push job because the job’s Docker image (like docker:24.0.5) only provides the Docker CLI, not the Docker daemon (engine). The CLI alone can’t build or push images—it needs to connect to a running Docker daemon.
By adding services: - docker:24.0.5-dind, GitLab starts a separate container running the Docker daemon (Docker-in-Docker). Your main job container can then communicate with this daemon over the internal network, allowing commands like docker build and docker push to work.
In short, the services section ensures there’s an actual Docker engine available for your job, not just the CLI, so you can build and push Docker images inside your CI pipeline.
Setup my Gitlab CI/CD for fastapi-todo-demo
There are 3 stages in this pipeline:
-
test:
Test it will be triggered when there is a merge request or tags with the name of
v*.*.*. this stage will run by installing the depedency usinguv syncand run the test usingmake test -
build:
Build the application and create a Docker image triggered when only tags with the name of
v*.*.*. This stage will install make and build the Docker image usingmake buildand push the Docker image to Docker Hub usingmake docker-push. -
deploy:
Deploy the Docker image to GCP VM instance triggered when only tags with the name of
v*.*.*. This stage will install SSH client and SSH to GCP VM instance usingsshcommand. Then will ssh to GCP VM instance and login to Docker Hub usingdocker loginand pull the Docker image from Docker Hub usingdocker pull. After that, it will stop and remove the old container and run the new container usingdocker run.
.gitlab-ci.yml
The following code is the GitLab CI/CD pipeline that will be used to build and deploy the application.
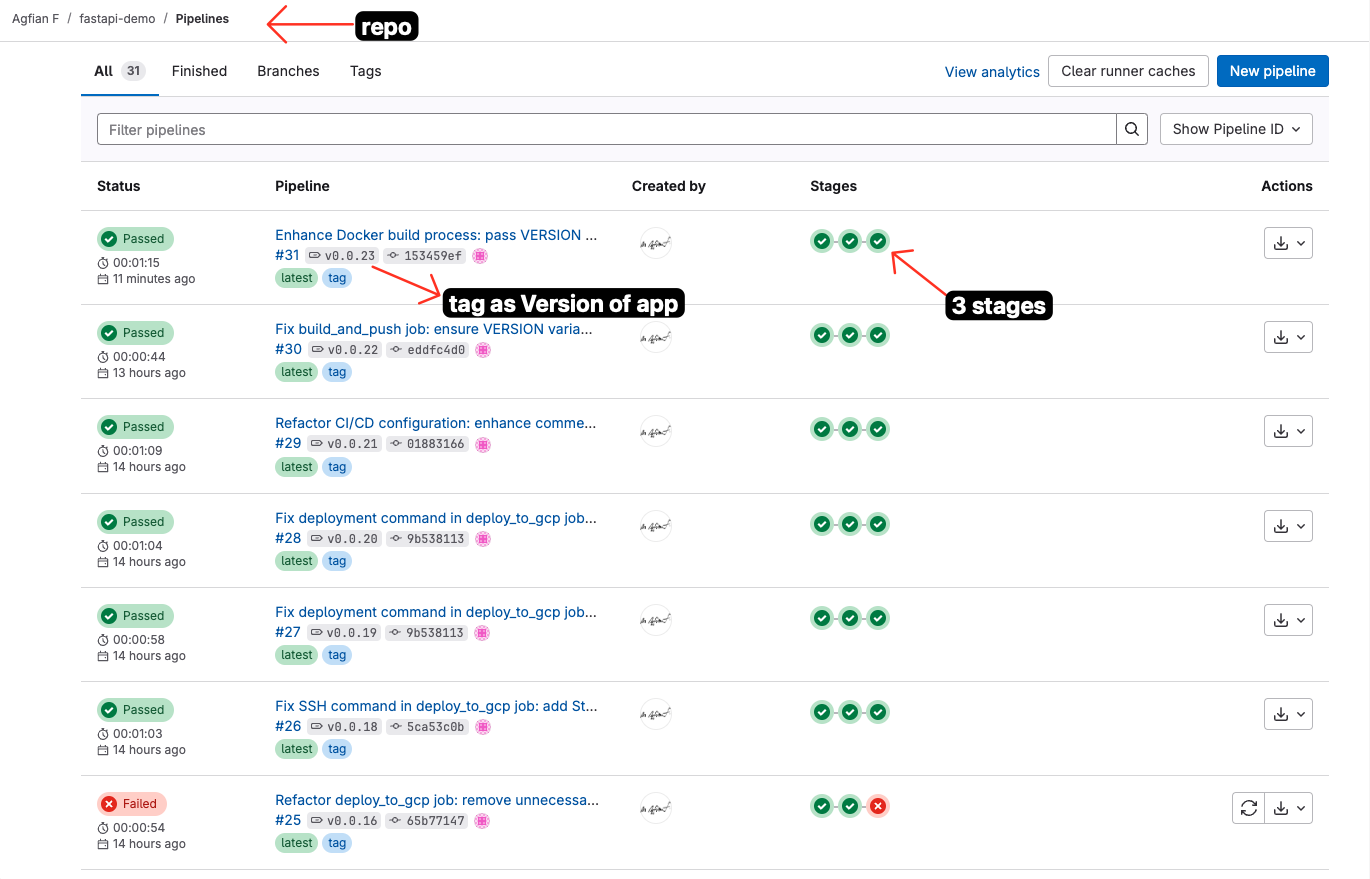
4. Result
- This is the list of history of the pipeline
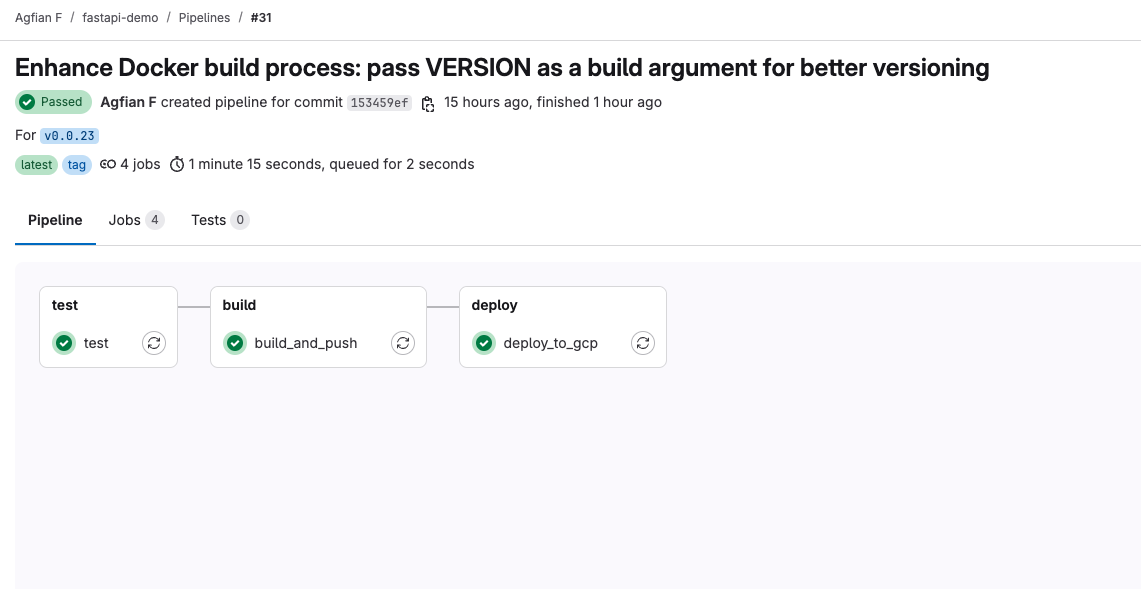
- This is the detail of the successful pipeline. Showing the stages and jobs that run successfully.
- This is the detail of the one of the job
deploy_to_gcp. Showing the SSH connection to GCP VM instance and run the command to pull the Docker image from Docker Hub and run the container.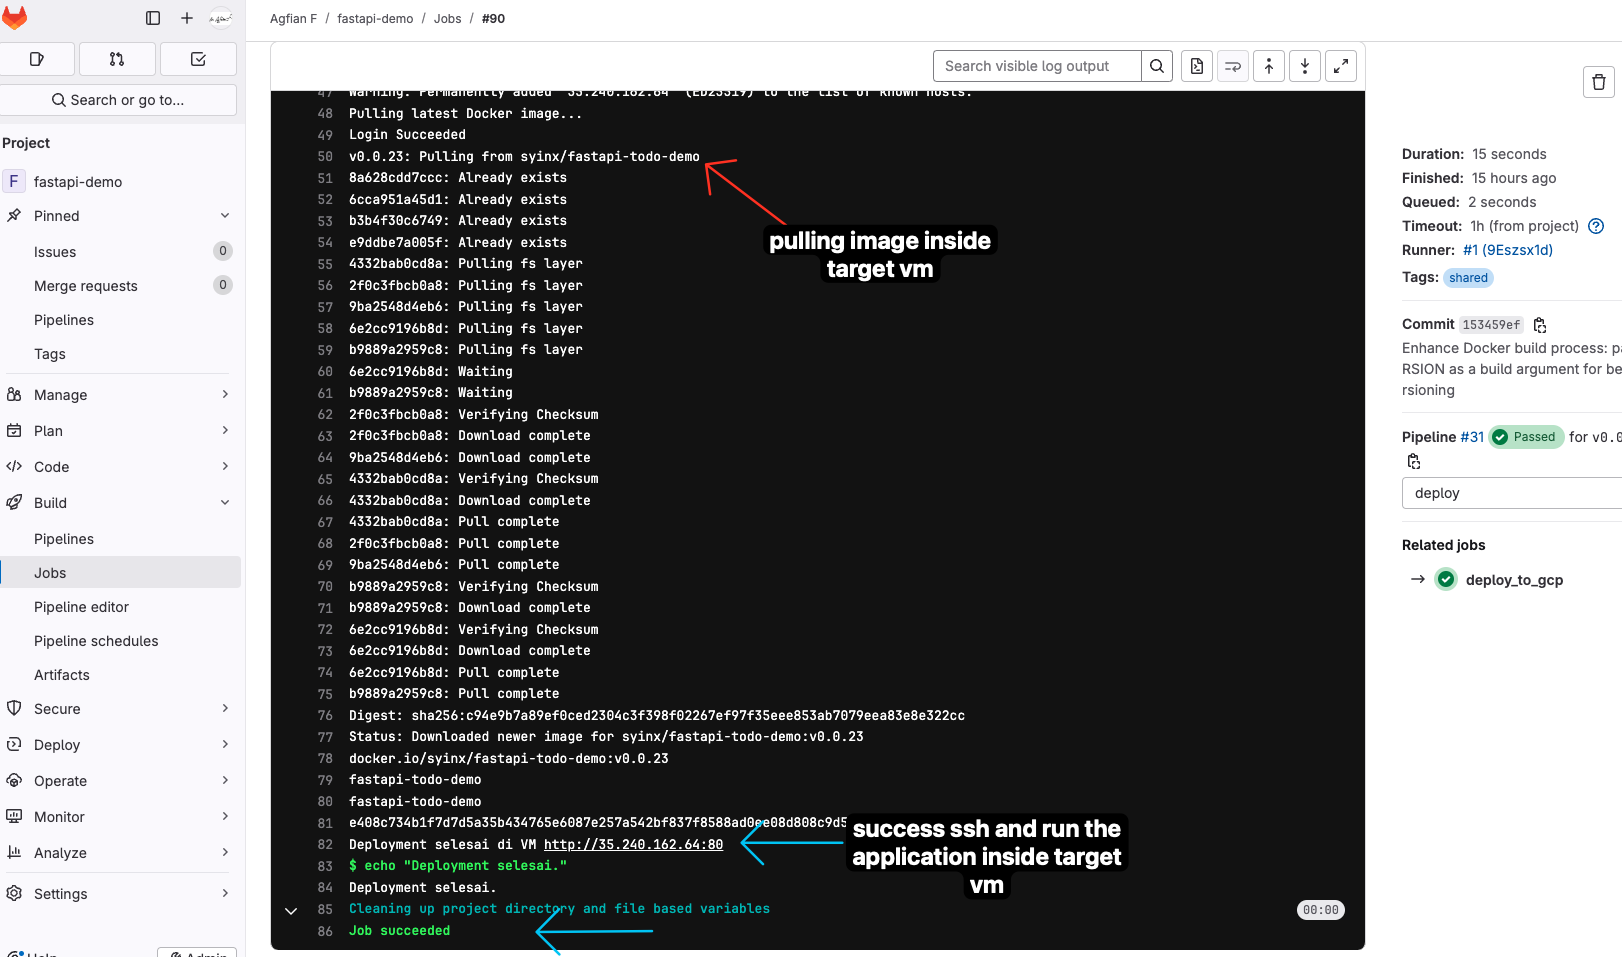
- This is result that version api
v0.0.23is deployed same as the tag on gitlab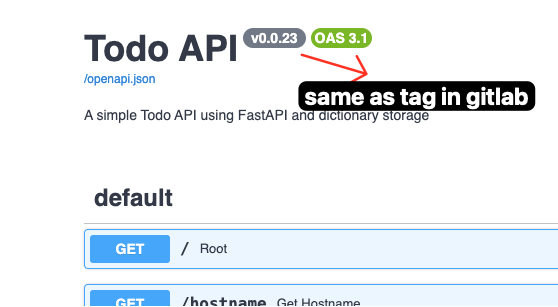
Summary
In this tutorial, I have shown you how to create a CI/CD pipeline using GitLab CI/CD. I have also shown you how to create a simple FastAPI application and deploy it to GCP VM instance using Docker. I have also shown you how to create a self-hosted GitLab server and GitLab runner using Docker. I hope this tutorial is useful for you. Thank you for reading!
That’s my DevOps adventure! Try it out, tweak it, or tell me about your setup in the comments. What’s next, Kubernetes? Stay tuned!